

What You'll Build
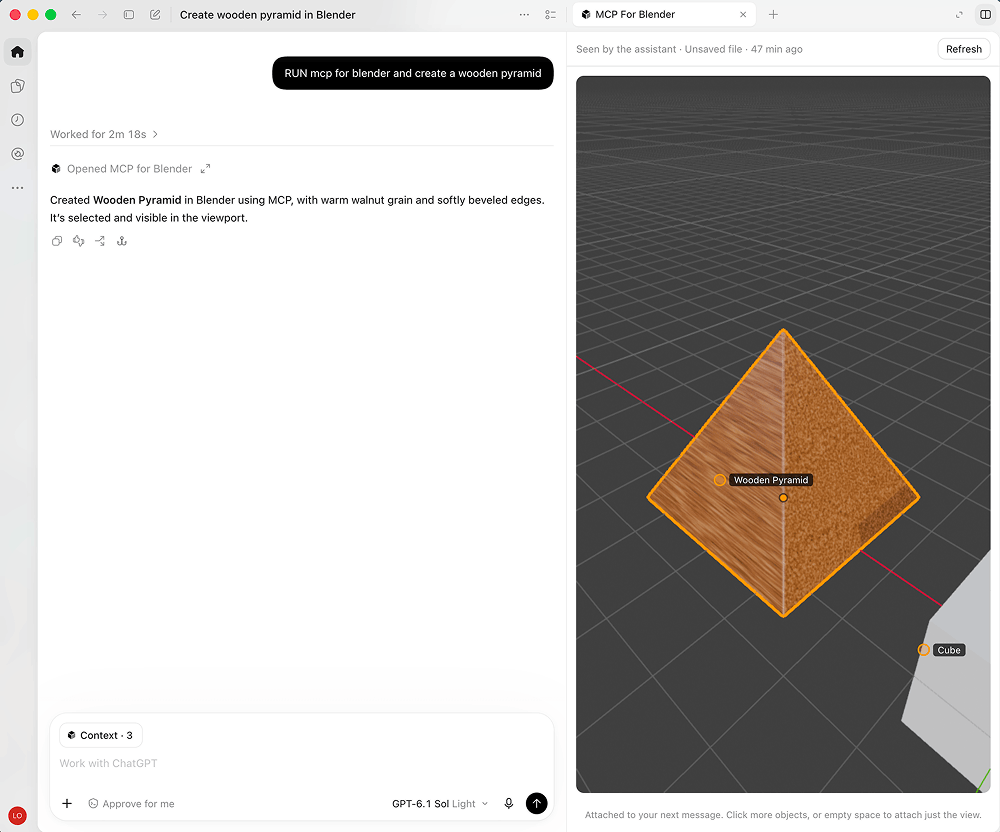
Model in Blender by speaking to an AI. In the image above, on the left you tell Codex "create a wooden pyramid," and on the right the Blender viewport shows a pyramid with a wood texture and beveled edges. It is an editable Blender object, not a picture.
This is for people who use Claude Code or Codex and want to try AI-driven 3D. It takes about 20 minutes.
Before You Start
- Install Blender on your computer (free download from the official site).
- An AI client that supports MCP: Claude Code, Claude Desktop, Codex, or Cursor all work.
- You don't need to know how to code, and you don't need Blender modeling skills.
Step 1: Copy the Skill from This Site to Your Agent
Open the BlenderMCP Skill page. At the very top there is a block titled "Hand this Skill to your Agent."
- Click Copy prompt.
- Paste it to your Agent (Claude Code, Codex, etc.) and send it.
The Agent reads the skill and handles installation for you: it installs uv, configures the MCP client, and installs the Blender add-on. It tells you what each step is doing. When something needs your confirmation (such as editing a config file), it asks you first.
Step 2: Restart the AI App and Open Blender
After installation finishes:
- Fully quit your AI app and reopen it so it reads the new MCP configuration.
- Open Blender. The add-on starts the server automatically when Blender launches.
- Go back to the AI conversation and ask "Are you connected to Blender?" If it can answer with information about the current scene, the connection works.
Step 3: Create Your First Object with One Sentence
Start simple, for example:
- "Create a pyramid with a wood material and slightly beveled edges."
- "Place a table in the middle of the scene with two chairs beside it."
- "Add a warm point light coming from the upper left."
The Agent calls Blender's tools to build the object and tells you what it created. Switch to the Blender window to see the result, or select, move, and edit it by hand.
Step 4: Refine One Sentence at a Time
The best way to use AI for 3D is small iterative steps, not asking for a complete scene at once:
- "Make the pyramid a bit taller and darker in color."
- "Turn the chair toward the table."
- "Change the whole scene to dusk lighting."
After each change, check the Blender viewport, and move on once you're satisfied. Asking for too much at once makes results harder to control and mistakes harder to trace.
Step 5: Save and Run a Pre-Delivery Check
When you're happy, ask it to save the project, or use File > Save in Blender yourself.
Before using the work in a real project, check these yourself:
- Blender version: matches the version the add-on requires.
- Add-on permissions: the add-on is enabled and can operate on your project.
- File paths: the import, export, and save locations are correct.
- Model quality: AI-generated models often need human cleanup in topology, proportions, materials, and naming. Don't deliver them as-is.
Good Uses
- 3D prototypes: quickly block out a rough form.
- Asset sketches: a base for later refinement.
- Scene layout: placing furniture, lights, and arrangements.
Fine sculpting, character rigging, and complex animation still need a human.
FAQ
Sign in to unlock this key section
New accounts get 10 free credits, plus 1 more for each daily check-in. Spend 1 credit to unlock and it stays open for you.
Further Reading
- BlenderMCP Skill page: /skills/blender-mcp
- New to MCP? See the MCP Handbook.
- Project repository: https://github.com/ahujasid/blender-mcp
Comments (0)
No comments yet. Start the conversation.