

What you will get
You already have talking-head clips where you speak straight to the camera. This tutorial shows you how to hand them to your AI agent, add moving charts and web screenshot highlights, and package everything into an explainer video like the ones big finance and science creators make. The tool is an open-source skill called xiaolin-explainer-packaging. It comes with a set of ready-made layouts and runs on Remotion, a tool that makes videos with code. The article includes 3 prompts you can copy and paste.
First, here is how the work is split. You prepare the script and the on-camera footage. The skill only handles the explainer layer, which means charts, captions, transitions and sound. Your job is to decide what this episode is about, answer a few multiple-choice questions, and then review the key frames and point out what to fix.

Why these visuals look so professional
The author went through a public video by a finance creator frame by frame and wrote the patterns into the skill's rules. The core logic is simple. Every time a keyword is spoken, something on screen moves with it. A number drops in, or a line chart draws up to the right year. Watch for three things:
-
Make the subject big. Charts fill more than 60% of the frame, or the frame edge cuts part of them off. They should never sit small in the middle like a slide.
-
Light up whatever is being discussed. The current item lights up, the rest dims and blurs, and the camera moves over to it.
-
Pick the drawing based on the episode's topic. Take a price line heading up. In a coffee episode a coffee bean can ride its tip. In a housing episode it becomes a tiny house. A chart with only numbers looks the same in every episode, and viewers won't remember it.
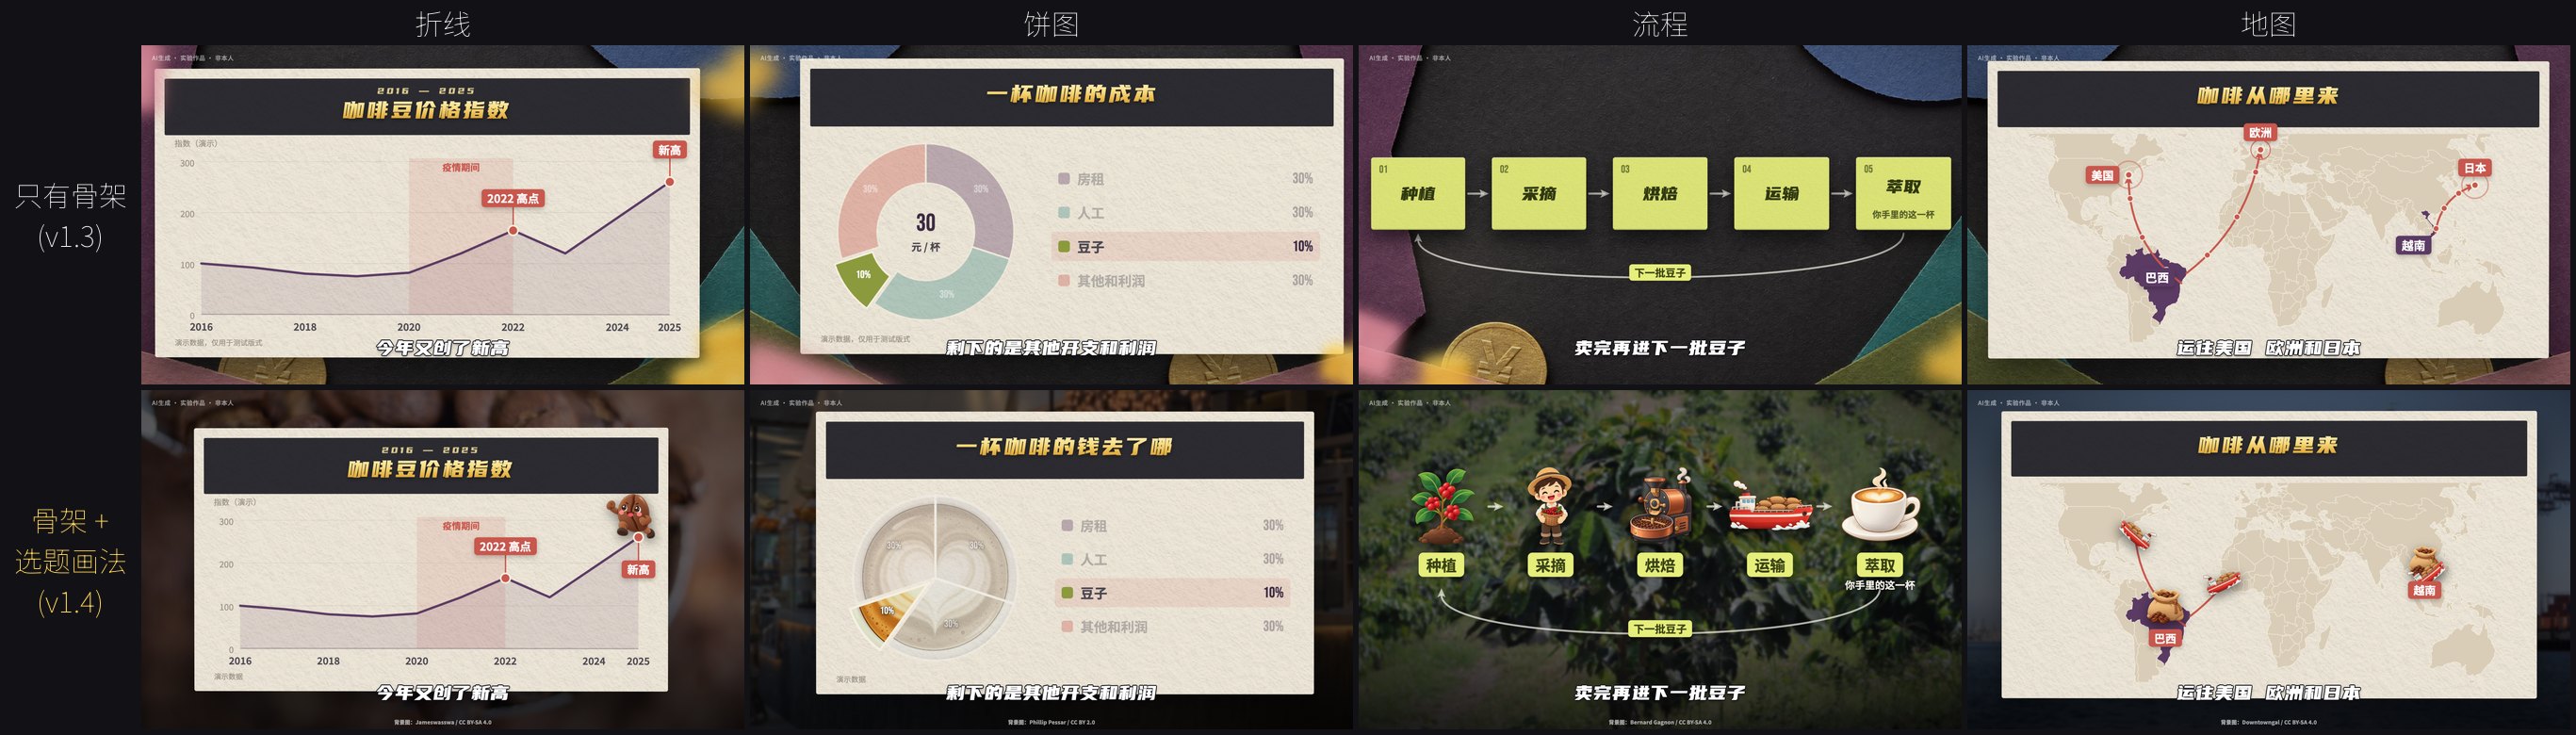
The image comes from the project README. The top row is the bare layout. The bottom row adds real photos and episode-specific props. The difference is easy to see.
Step 1: Prepare the talking-head clips and script
The skill needs only two inputs:
-
One video per sentence: a 1920×1080 mp4 file for each sentence. Record it yourself or generate it with another tool. The skill does not generate on-camera footage.
-
The text for each sentence: the spoken text and the caption text you want to show.
If you haven't split the script into single-sentence clips yet, that's fine. Give the whole talking-head recording to your AI agent, and ask it to cut the clip by sentence and transcribe each one. Then check the text for typos. If your script uses numbers, note where each one comes from. Every number that appears on screen needs a traceable source.
Step 2: Have your AI agent install the skill and run the demo first
You don't need to type any commands for this step. Send the message below to your AI agent:
Install the open-source skill xiaolin-explainer-packaging (https://github.com/howoneai/xiaolin-explainer-packaging) and run the demo project that comes with it.
Requirements:
1. First check whether my computer has Node 18 or higher, ffmpeg, and python3 with numpy and Pillow. Tell me what is missing, and wait for my approval before installing anything
2. Put the skill folder into your own skills folder
3. Create a project in demo mode, render a few key frames, and stitch them into one image for me to look at
4. Tell me whether the title font YouShe Title Black is installed. If it isn't, tell me where to download it and where to save it
5. Report each step in plain language. If you hit an error, try to fix it yourself first. If you can't, ask me a multiple-choice question
Why run the demo first: the demo uses a fake talking-head clip and sample data. It confirms that your computer can render the video, and it shows you which layouts are available. It also keeps your real footage from being used as a test subject.

The image comes from the project README and shows the main layouts rendered by the demo project. The author has tested it only on an Apple silicon Mac and only inside Manus. It may work in other agents, but it hasn't been tested there. That's why running the demo first is worth the time.
Step 3: Choose a theme and answer three setup questions
Before it starts work, the skill asks you three things. Decide your answers ahead of time to save back-and-forth:
-
Background: Do you have a fixed background you always use? If not, pick one of the 6 themes. For finance and livelihood topics, pick Paper cut print (finance). For history and humanities, pick Newspaper (press). For AI and software, pick Blueprint (blueprint). For cybersecurity, pick Retro terminal (terminal). For lifestyle and consumer topics, pick Desk (desk). For anything else, pick Modern magazine (editorial).
-
Channel logo: Fill in your own channel logo. If the on-camera footage is AI-generated, keep the "AI-generated · not the creator" label on screen.
-
Real materials: Is there any report, article, web page screenshot or product logo you must include? If not, the skill will look for sources itself.

The image comes from the project README. Switching themes takes one word. The paper texture, fonts, cards, and intro and outro all change together. If you're not sure which to use, ask your agent to render a few key frames for two or three candidate themes, then pick the one you like best.
Step 4: Review the scene table before rendering key frames
This step matters most. Have your AI agent list how each scene will look. Once you've read it and approved it, the agent starts writing the storyboard.
Sign in to unlock this key section
New accounts get 10 free credits, plus 1 more for each daily check-in. Spend 1 credit to unlock and it stays open for you.
Why review the scene table first: if the drawing is wrong, everything has to be redone, no matter how good the render looks. The scene table is just a table, and it takes seconds to change. While you read it, ask yourself: if I hide the props and photos, does this frame still look different from other topics? If it doesn't, ask the agent to rethink the drawing.
When you review the key-frame contact sheet, just say what's wrong. For example: "this text is too small," "this blocks the subtitles," or "this number doesn't match the script." Then let your agent fix it. The author recommends reviewing at least twice.
Step 5: Render the full video and let the agent run a frame-by-frame check
When the key frames look right, ask your agent to finish up:
The key frames look good. Render the full video, mix the voice and background music, then run a frame-by-frame check. Fix any bad frames before you hand it over. Also export a compressed version for phones. Tell me where the final video is and how long it runs.
Why run a frame-by-frame check: a still frame can look fine while the full video still has problems. A frame in the middle of an animation may be misaligned or blank. The skill's audit script compares each video frame with its matching still frame and flags the ones that are wrong.
Limits to know before you start
-
This is an unofficial style recreation. It has no connection to that creator or their team. Don't put a real creator's logo, likeness or voice in a video you publish. Don't present the final video as the creator's work.
-
Remotion has license terms. Individuals, companies with 3 or fewer people, and non-profits can use it for free, including commercially. Companies with 4 or more people need to buy a company license.
-
Download the title font yourself. YouShe Title Black (优设标题黑) is free for commercial use, but it is not in the repo. Without it, titles and captions fall back to Source Han Sans, and the style gets much weaker.
-
The built-in world map is a low-precision sketch. It doesn't meet mainland China's map review rules for published maps. If your video shows China's borders, use an officially approved map with its review number.
Things to watch
-
It does not write your script or generate on-camera footage. Prepare both first.
-
It supports only 1920×1080, 24 fps landscape video. It won't work for vertical short videos.
-
Prop images need a tool that can generate images. If your agent can't generate images, prepare transparent-background PNGs yourself.
-
The first install and the first render need internet access. Remotion downloads a browser, so it can be slow. That's normal.
If you want a more handmade look for your talking-head video, see the tutorial paper-collage B-roll without hunting for footage. To preview and edit your talking-head video as you go, see the skill Remotion talking-head director.
Comments (0)
No comments yet. Start the conversation.