

What you'll get
Meta's Muse can make videos, but only one click at a time on its website. The open-source project muse2api reverse-engineers the Muse website into a video-generation API. MuseAPI-Video builds a local studio on top of it. Write your prompts, queue them, and they generate on their own. Every clip lands in one place, and you can line the clips up on a canvas as a storyboard. For a series short or a comic drama, that means no more clicking clip by clip and no more hunting through your downloads for clip three. This guide includes 3 copy-ready prompts.
It is an unofficial tool made by the community. It uses the quota of your own Muse account, and the picture quality still depends on Muse itself. It won't make Muse any better. It just means fewer files to dig through and fewer repeated steps.

How it works first
MuseAPI-Video runs on your own computer in two layers:
-
The bottom layer uses the open-source project muse2api. It opens a hidden Chrome window in the background and uses your logged-in session to operate the Muse website for you.
-
The top layer is a web studio. You open it in a browser. You write prompts, check task progress, and manage your work here.
Keep three things in mind:
-
It is not an official Meta API. If the Muse website changes its layout, the tool may stop working for a while until the author updates it.
-
It reads your Muse login. To bind your account, you install a browser extension. The extension hands your login info to the studio, and the studio runs on your machine. Only install the extension from the project repo. Never use a modified copy from an unknown source.
-
Automating an account may break platform rules. Bind only your own account. Don't buy or borrow accounts, and don't run many accounts at once to get around quotas. If your account gets banned, that risk is yours.
Step 1: Download MuseAPI-Video
Download it from the MuseAPI-Video on lvruan.com page. The page has a feature list and screenshots. It also links to the project's GitHub repo if you want to read the source.
It mainly runs on Windows for now. You start and stop it with the PowerShell scripts that come with Windows. It also runs on Mac and Linux, but those take a few more steps. We suggest letting an agent handle that.
Step 2: Let an agent install and start it
To run it, you need Node.js, Python, and Chrome. The first start also installs a set of dependencies. You don't have to set these up yourself. Send this text to Claude Code or Codex:
I downloaded MuseAPI-Video (source: https://github.com/LIUFelix2004/museAPI-video) and want to use it on this computer. Please help me:
1. Read the README first. Tell me in plain language which software it needs, and check what my computer is missing.
2. List what needs to be installed, and wait for my approval before installing anything.
3. Before starting it, change the default admin password and JWT_SECRET in server/.env to new random values. Tell me the new password once.
4. Run it only on this machine. Do not expose the port to the internet.
5. After it starts, tell me which address to open in the browser and how to stop it.
The project ships with a public default admin password. If you don't change it, anyone on the same network may be able to log in and use your Muse account. Rule 4 works the same way. The studio is for your own use only.
Step 3: Bind your own Muse account
Without a bound account, it can't generate anything. Binding uses a small Chrome extension. This step takes a few clicks from you:
-
Log in to the Muse website in the same Chrome first. Make sure you can chat normally.
-
Open the studio. On the left, click muse import (muse 导入). Then click One-click bind (一键绑定) in the top right, and follow the prompts to download the extension package. After you unzip it, put the folder in a fixed spot. Don't move or delete it later.
-
Type
chrome://extensionsin the Chrome address bar. Turn on Developer mode in the top right. Then click Load unpacked, and select the folder you unzipped. -
Go back to the studio and click One-click bind again. When the page shows "Bound successfully (绑定成功)," you're done.
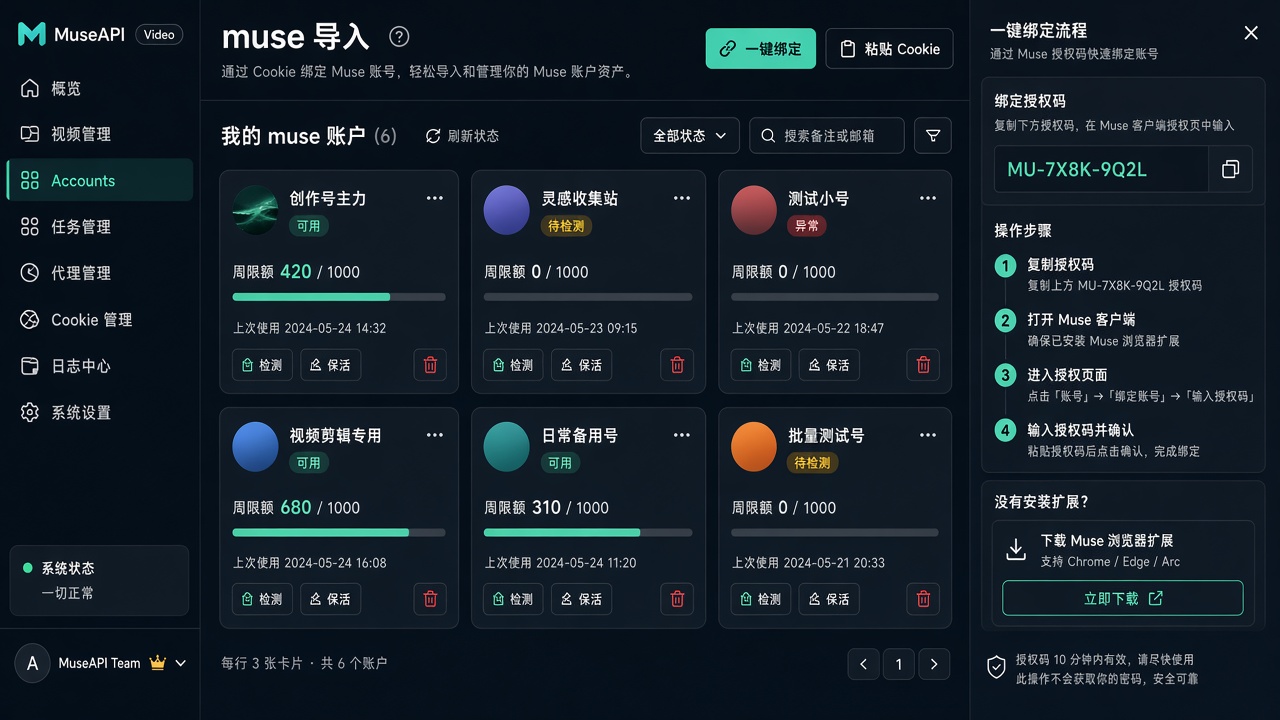
After binding, the account card shows the status and how much quota is left this week. The project notes say the login session expires about every two days. The studio renews it automatically. If the card turns red and says "Error (异常)," log in to Muse again and bind once more.
Step 4: Split the whole short film into shots, then queue them
For a series, don't make up prompts one clip at a time. First, ask AI to break the story into a set of shots with one consistent style. Then queue them all in the studio at once. Send this text to any AI assistant:
Sign in to unlock this key section
New accounts get 10 free credits, plus 1 more for each daily check-in. Spend 1 credit to unlock and it stays open for you.
After you get the 6 prompts, go to Quick create (快捷创作) in the studio:
-
Upload the main character's reference image, and refer to it with
@in the prompt. -
Choose the length and aspect ratio. Click Queue (加入队列) once for each prompt. Then let the queue run them one by one.
-
The queue can be paused, resumed, and reordered. If you spot a weak prompt partway through, pause, fix it, and then continue.
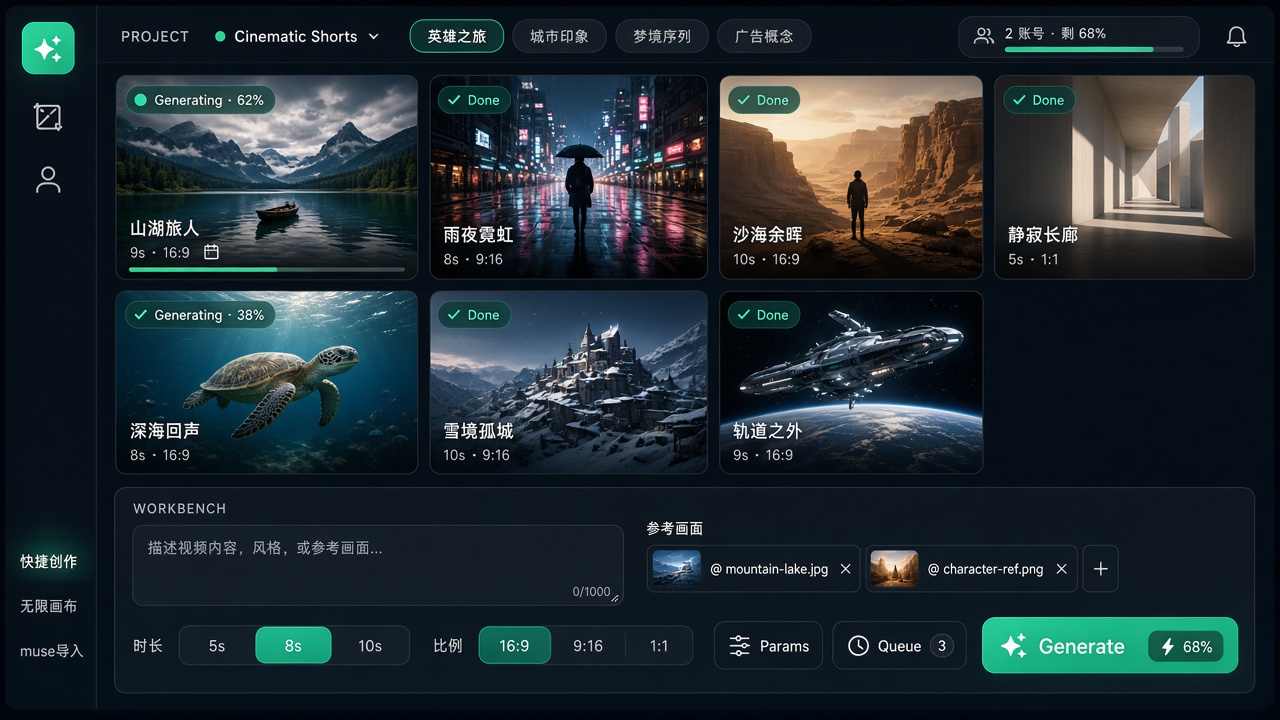
Splitting the shots first matters. If you write each clip on its own, the character's looks and art style often change from one clip to the next. Write everything as one consistent set first, then queue. The clips will then feel like one film when you line them up.
Step 5: Line up the clips into a storyboard on the canvas
Each finished video becomes a card on the Infinite canvas (无限画布). Arrange the cards from left to right in story order. Add a few text notes beside them. You can see at a glance which clip needs a redo and which one needs trimming. The canvas saves automatically, so it will still be there the next time you open it.
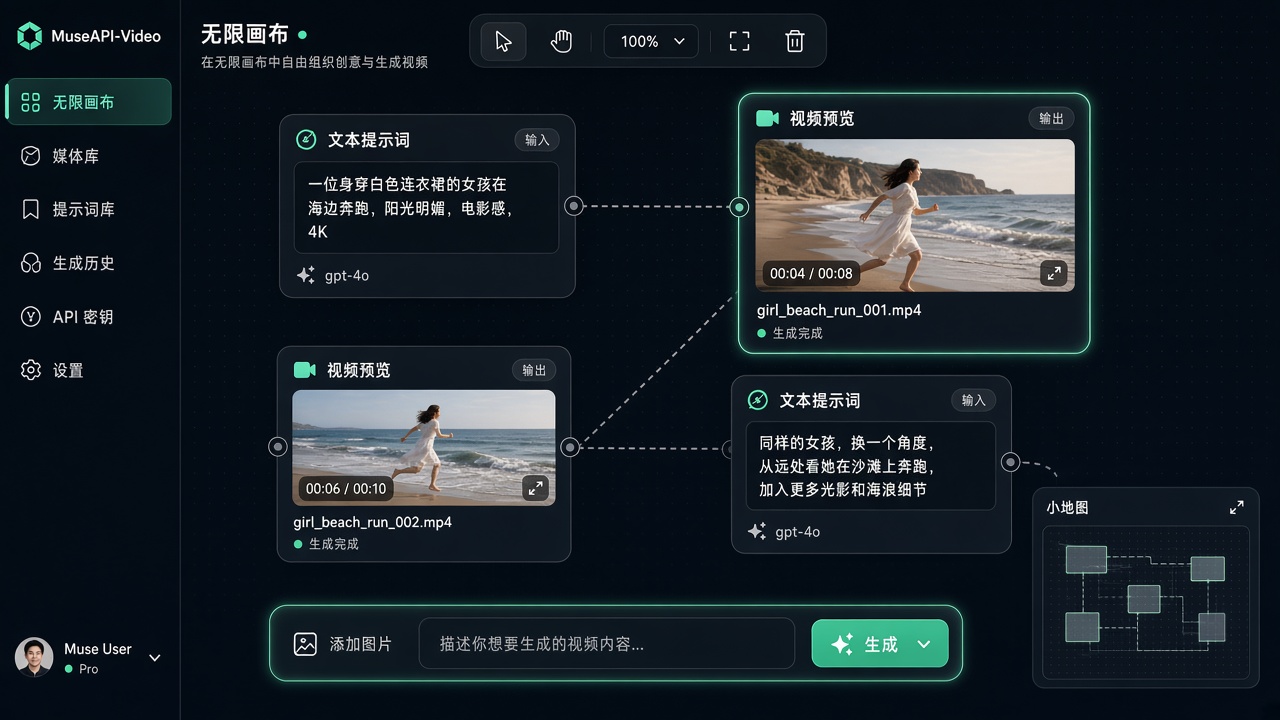
If you don't like one clip, regenerate just that card on the canvas. You don't need to go back and dig up the prompt. Once you're happy with all of them, download the clips, put them into your editing app in canvas order, and assemble the final cut. Then add subtitles and music.
To change one clip, you can say this to the AI:
Clip [3] came out with the main character in different clothes, and too much happens in it. Please change only this clip's prompt:
1. Keep the main character description and the @hero reference exactly the same as in the other clips.
2. Keep only one action: [one action].
3. Don't change the prompts for the other clips.
Notes
-
This is an unofficial tool. If the Muse website changes, the tool may suddenly stop working. Wait for the author to update it. Don't keep rebinding over and over.
-
Generation uses the quota of your own account. When the quota runs out, it resets next week. Check the amount left on the account card before you queue.
-
The project repo doesn't state an open-source license. Using it for yourself is fine. If you want to modify it and offer it as a service to others, contact the author first.
-
Your content must follow Muse's usage rules. When you publish, label it as AI-generated, as each platform requires.
References
-
Download: MuseAPI-Video on lvruan.com
-
Source: LIUFelix2004/museAPI-video (GitHub)
-
Base project: czg86389-hub/muse2api (GitHub)
Want your AI assistant to call Muse directly to make images and videos? See Let Claude Code make images and videos with your Muse account. Want to plan character poses first? See Make AI video characters stop moving like puppets with a one-tap Muse pose library.
Comments (0)
No comments yet. Start the conversation.