


You see a well-made video and want to make one yourself. The first question is usually: how was it actually made? Was it filmed, AI-generated, or built with code-driven motion graphics? When do the subtitles appear, how many beats does the music have, and where are the cuts?
Tools now exist that let an Agent help you "reverse-engineer" a video. This tutorial covers two tools with completely different approaches and how to choose between them based on your needs:
Sign in to unlock this key section
New accounts get 10 free credits, plus 1 more for each daily check-in. Spend 1 credit to unlock and it stays open for you.
In short: to learn the method, use REA-Video; to get an editable replica project, use HyperFrames. The two can be used one after the other.
A heads-up first: reverse-engineering is for learning, not for copying
Both projects state clearly that reverse-engineering is meant to help you learn another work's structure, pacing and techniques, and then to make your own video using material you have the right to use. Do not directly reuse someone else's visuals, music, people or likenesses, and follow platform rules and AI-content labeling requirements when publishing.
Option 1: Use REA-Video to break down the production method
REA-Video is an open-source tool built for Agents. You give it a finished video, and it cuts out each shot, judges whether each one is live-action, AI-generated, 3D or code-driven motion graphics, then breaks apart the subtitles, editing and sound, and finally gives you a plan for "how to replicate it."
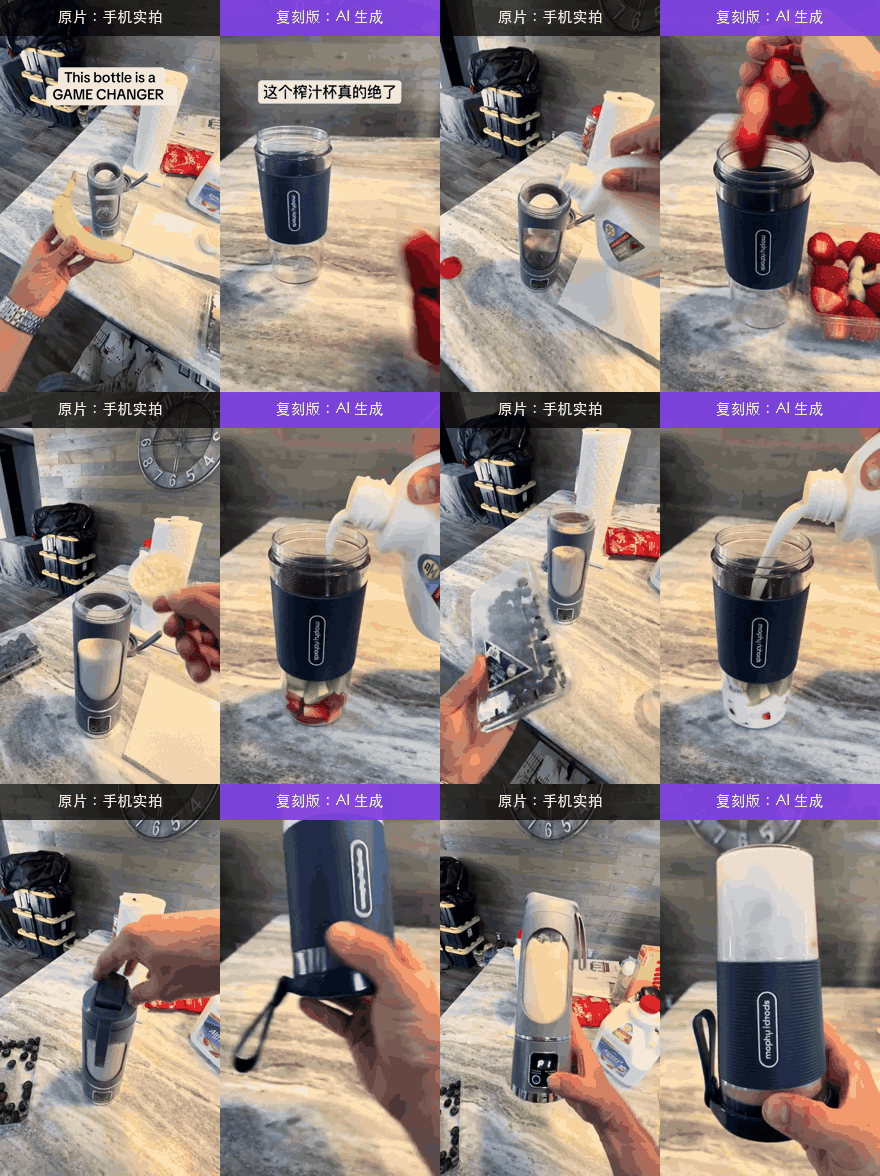
Image from the REA-Video repository README: on the left is a phone-shot product video; on the right is a version someone remade with AI, swapping the product. The tool determines that everything on the left is live-action, with one scene and two camera angles; everything on the right is AI-generated, and 8 shots can be combined into 3 generation runs.
What it can break down
- How the visuals were made: Live-action shots get camera position, shot size, camera movement and lighting; AI shots get the reasoning behind the judgment and reverse-engineered prompts; code-driven motion graphics get text, layout and motion rhythm.
- Subtitles and styled text: When each line appears and disappears, which can be exported as SRT or ASS, along with color, outline and entrance style.
- Editing: Where the cuts are, how fast the pacing is, and whether they land on the beat.
- Sound: Human voice or AI voiceover, whether the music is AI-generated or from a library, its BPM, and where sound effects land.
- Material you need to prepare yourself: For example screen recordings, screenshots and product images.
Step 1: Prepare the environment
You need an Agent that can run commands (Claude Code and Codex both work), with ffmpeg and Python 3.10 or higher installed on your computer.
Step 2: Hand the video to the Agent
The simplest way is to tell the Agent directly:
Install https://github.com/JuneYaooo/rea-video, then break down this video: /path/to/video.mp4
The Agent will install the command-line tool itself, read the workflow and run it through. Try to provide the original file, not a re-compressed version downloaded from a platform; the reason is explained below.
Step 3: Read the report
You get three things:
- A one-line conclusion, for example "41% AI video + 59% code interface, 8 seconds of real screen recording, library music at 122 BPM."
- A replication plan, grouped into "to film, to generate, to code."
- A full
report.html, where each shot has keyframe screenshots, the basis for the judgment, prompts, notes on camera movement and lighting, plus a sound breakdown.

Image from the example report in the REA-Video repository: a mixed 19-second video with 10 shots, combining AI character dialogue, a code interface and 8 seconds of real screen recording. The tool found that 5 dialogue shots, though separated by interface shots, belong to the same scene and can be generated in one go.
When reading the report, focus on two things:
- Share of production methods: This directly determines cost. If most of it is code-driven motion graphics, you do not need to pay for a video model; a Remotion project can do the job. If it is live-action, shoot according to the camera position and lighting checklist.
- Generation units: Based on the capabilities of the target video model (maximum seconds per run, whether multiple shots can be produced at once, how many reference images it accepts), it groups AI shots together and tells you how many calls you will need in total.
Step 4 (optional): Connect a model that can watch video
You can use it without a model; pure tool mode works offline and for free. However, if you are breaking down a video downloaded from a platform, it is recommended to give the Agent a model that can view video (Gemini or Doubao both work). Just provide the endpoint address and key, and costs are billed at that service's rates.
The reason is that platforms re-compress video, which wipes out evidence such as noise. According to the project's own published tests: with the original file, the tool alone reaches over 98% accuracy; with a re-compressed video, the tool alone drops to 88.6%, and adding a vision model brings it back to 99.6%.
Step 5: Follow the plan
- Live-action shots: Film them yourself according to the shooting plan in the report.
- Code shots: Have the Agent write them as a Remotion project.
- AI shots: Generate them using the prompts in the report. The author also has a separate capsule-cinema that can generate them automatically and put them back into the original timeline; it does a free trial run first and only calls the paid model after you confirm.
Remember: REA-Video does not render the video itself. Its value is letting you know, before you start, whether each shot should be filmed, generated or coded, so you avoid wasting money.
Option 2: Use HyperFrames to directly rebuild an editable project
HyperFrames is an open-source framework from HeyGen for "writing video in HTML." Its newly released reverse-any-video skill takes a different path: rather than only telling you how to make it, it directly rebuilds a project that aligns frame by frame with the original and that you can keep editing.
How it reconstructs the original
- The timeline follows the original: Canvas size, frame rate and duration all match the original, and every cut is precise to the frame, including jump cuts and push-ins within a single continuous shot.
- Each layer is handled separately: Text, subtitles, stickers, cards, interfaces and charts are rebuilt in HTML; photos, icons and logos in the frame are cropped out of the original separately, and logos use the real brand mark rather than being hand-drawn.
- People in the frame are re-shot with HeyGen, so their movements and lip movements match the original.
- Finally, a frame-by-frame comparison: After rendering, it diffs the result against the original, listing missed cuts, extra cuts, sound offsets and the frames that differ the most, then fixes them and compares again.
Understand the gate first
- This is a HyperFrames Pro exclusive feature, 25 US dollars per month, separate from your HeyGen membership. Free accounts will be rejected; the Agent will give you an upgrade link, and you make the payment yourself; the Agent will not buy it for you.
- Pro comes with a set amount of credits each month; re-shooting people and cloud rendering consume credits. If you run out partway through, the Agent will total up how many are needed and wait for you to top up before continuing.
- Time required: For videos under one minute, about 20 to 50 minutes; longer videos are processed in segments.
- You need to log in with a HeyGen account; the HyperFrames account is the HeyGen account.
Hands-on
- Install the skill in your video project directory:
npx hyperframes skills update reverse-any-video. It is not installed with the core skills by default and needs to be installed separately. - Tell the Agent:
Use /reverse-any-video to rebuild this video: /path/to/video.mp4
- The Agent will first check whether you are logged in and whether you have Pro, then begin frame-by-frame research, layer-by-layer reconstruction, rendering and comparison.
- When finished, it opens a side-by-side comparison (original on the left, rebuilt version on the right) and starts a preview, where you can continue editing text and swapping materials.
How to combine them
A relatively economical order:
- First, break the video down with REA-Video, to see the cost structure of the video for free.
- If most of it is live-action or AI-generated, following its plan to film and generate is enough.
- If most of it is code-driven motion graphics, subtitles and interfaces, and you need a reproduction nearly identical to the original, then consider subscribing to HyperFrames Pro and letting it rebuild the project directly.
Common questions
- The judgments from the breakdown are inaccurate: First check whether it is a compressed version downloaded from a platform; try again with the original file or by connecting a vision model.
- Can REA-Video produce a new video in one click? No. It handles breakdown and planning; producing the video is up to you, whether by filming, using capsule-cinema to generate, or writing code.
- Can I use the HyperFrames reverse feature with a free account? No, it is explicitly a Pro feature. The HyperFrames framework itself and most of its skills are open source and free.
- I want to replace the people or products in the original: Both tools reconstruct the original by default. REA-Video combined with capsule-cinema can replace elements you specify; HyperFrames only adapts the video when you explicitly ask for it.
References
- REA-Video, Apache-2.0 license
- HyperFrames, Apache-2.0 license; reverse-any-video requires HyperFrames Pro
Comments (0)
No comments yet. Start the conversation.