


What you will get
You already have a fixed character, such as an avatar, a mascot, or a cartoon version of yourself made with AI. By the end of this guide, it can wave, nod, and celebrate, and the background is transparent. You can place it in a corner of a tutorial video, export it as an animated sticker, or put it on your personal website. The tool is the open-source Skill sprite-gen. You hand it to Codex or Claude Code, and you do not need to write any code. This guide includes 3 prompts you can copy and paste.
Here is how the work is split: the agent handles installation and generation. It takes care of frame creation, removing the background, and assembling the animation. You provide a good source image and pick the frames you like. The source image decides most of the result. If it is wrong, nothing you do later can fully fix it.

Why it keeps the character looking the same
If you ask an AI to draw "four frames of a waving character" directly, the face often changes from frame to frame, and the background is rarely clean. sprite-gen works differently. It locks your source image as the identity reference, generates one row per action on a solid-color background, converts that color into a real transparent channel, and then cuts the result into single transparent frames.
It was built for game sprites. It has nearly 4,000 stars on GitHub and uses the Apache-2.0 license. The image below comes from the project's demo. It shows the same wolf doing idle, working, and celebrating animations:
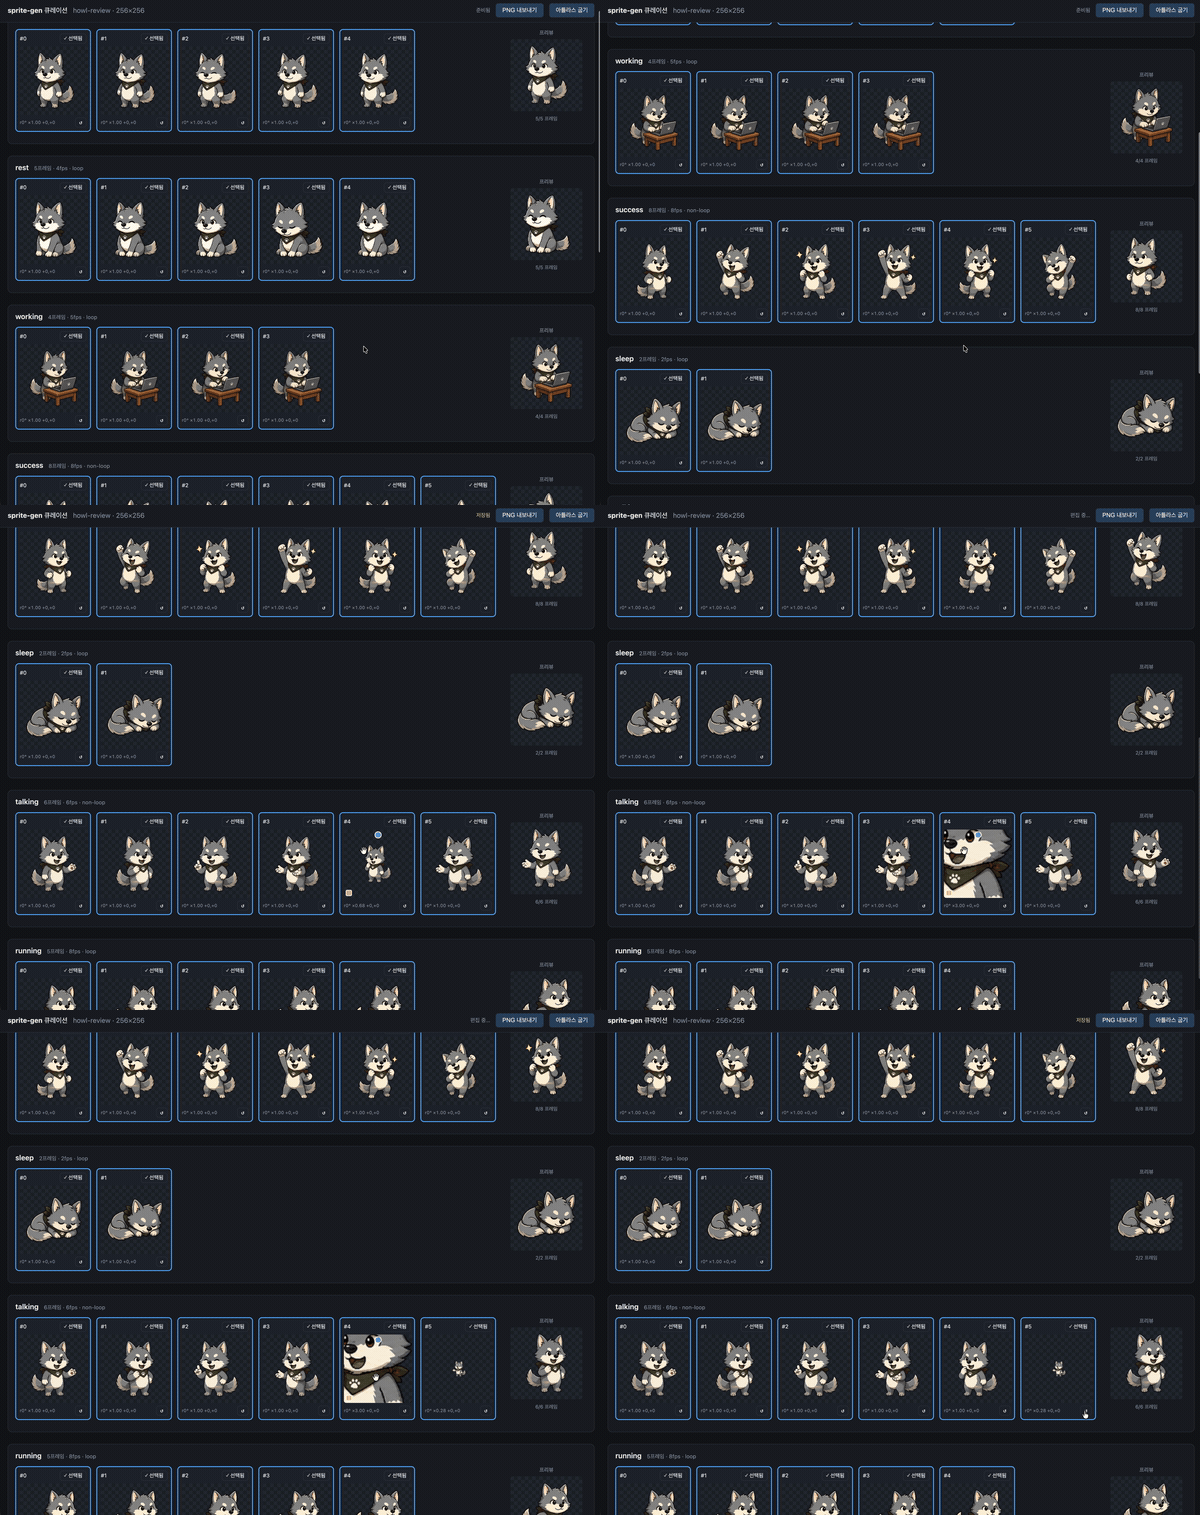
The image comes from the sprite-gen repository's README and docs.
When you use it on your own character, watch these three things:
- Finalize the source image first: Face shape, colors, and proportions are set in the source image. Later, you only change the actions.
- Keep the actions simple: Waving, nodding, blinking, and a happy little jump all work reliably. Turning around and running are continuous motions that tend to break.
- Deliver in a transparent format: For video, use a PNG sequence or WebP. GIF is only good for animated stickers.
Step 1: Prepare a good source image
sprite-gen needs one complete, uncropped full-body image in a standing pose. The style, proportions, and direction should already be what you want in the final result. Check these points:
- Full body in frame: Leave a little space above the head and below the feet. Do not use a head-and-shoulders avatar.
- A plain or clean background: No scenery or clutter.
- The direction you want in the end: If you want the character facing front, use a front view. If you want a side view, use a side view. Do not expect the tool to turn the character for you.
- Keep small accessories on the hands and head to a minimum. Accessories are the most likely to shift during motion.
If you only have a half-body avatar, ask the agent to draw a full-body standing image from it first. Confirm that it looks right before you continue.
Step 2: Have the agent install sprite-gen
Send the following to Codex or Claude Code:
Install the open-source Skill sprite-gen for me: https://github.com/aldegad/sprite-gen
Requirements:
1. First, check whether my computer has Python 3.11 or newer, ffmpeg, and the codex command line. If anything is missing, tell me. Do not install system-level software on your own.
2. Clone the repository into your Skill folder (use ~/.codex/skills/sprite-gen for Codex, or ~/.claude/skills/sprite-gen for Claude Code). Create a .venv virtual environment in the repository, then install it with pip install -e .
3. Run sprite-gen --help to confirm it works.
4. Tell me which account image generation uses, and whether it charges per use. Once installed, stop there. Do not generate anything yet.
The last item matters most. By default, sprite-gen generates images through the ChatGPT account you signed in to with the codex command line, which uses your subscription allowance. It only charges per use if you explicitly choose the OpenAI API or the xAI API, and it warns you before each such call goes out. Have the agent explain this first, so you do not find out later that it used the API.
Step 3: Choose a route
A common belief is that skipping Grok means rewriting the workflow yourself. It doesn't. The repository includes two routes, and after installation, it asks which one you want:
| Route | What creates the motion | What you need | Good for |
|---|---|---|---|
| GPT frame-by-frame | ChatGPT's image model draws each frame | Signed in to ChatGPT through codex | Small motions of 4 to 8 frames, such as waving, nodding, or blinking |
| Grok video | Grok Imagine first generates a short video, then the loop is cut from it | Signed in to SuperGrok through the grok command line, or an xAI API key | Smoother motions with more frames, such as jumping or entering the scene |
If you only have a ChatGPT account, choose the first route. It is the official path, not a workaround. Both routes produce transparent frames and a preview animation.
Step 4: Describe the actions and the format
This step decides whether you get files you can use right away. Edit the template below with your own details and send it to the agent:
Sign in to unlock this key section
New accounts get 10 free credits, plus 1 more for each daily check-in. Spend 1 credit to unlock and it stays open for you.
Why it is written this way: one action per line lets the tool generate each action as its own group. The line "the last frame returns to the standing pose" is for the wave. According to the project docs, a wave plays once by default. To loop it, you need a final frame that returns to the standing pose. Without it, the animation jumps at the seam. Asking for the call count up front matters because each action is generated separately. The more actions you request, the more of your allowance you use.
Step 5: Pick the frames in the curator
Not every generated frame will be good. sprite-gen includes a web-based curator page. All frames for each action sit in one row. A live loop plays on the right. You can delete broken frames, drag them to reorder, and adjust positions.
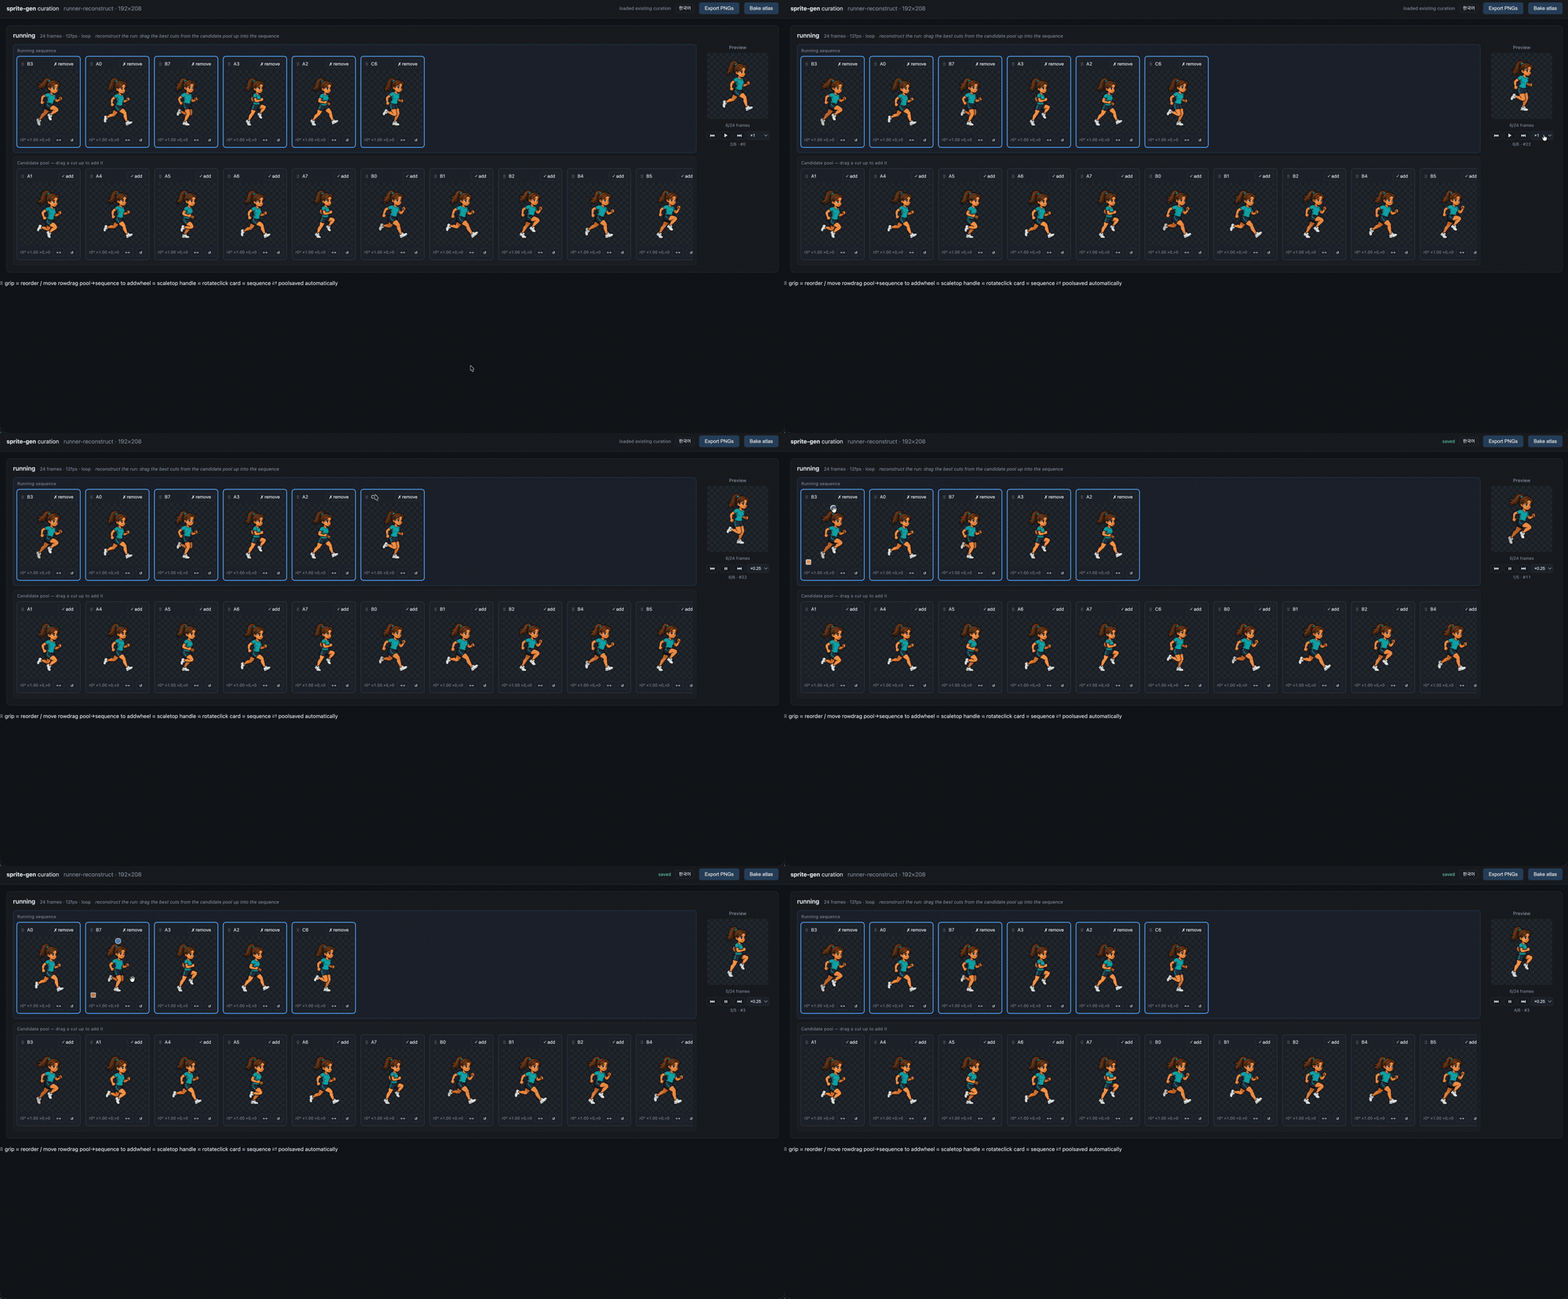
As you pick, focus on three things: whether the face changed, whether the hands have extra fingers or look broken, and whether the loop seam jumps. When you are done, ask the agent to export using your selections. Do not use its first version.
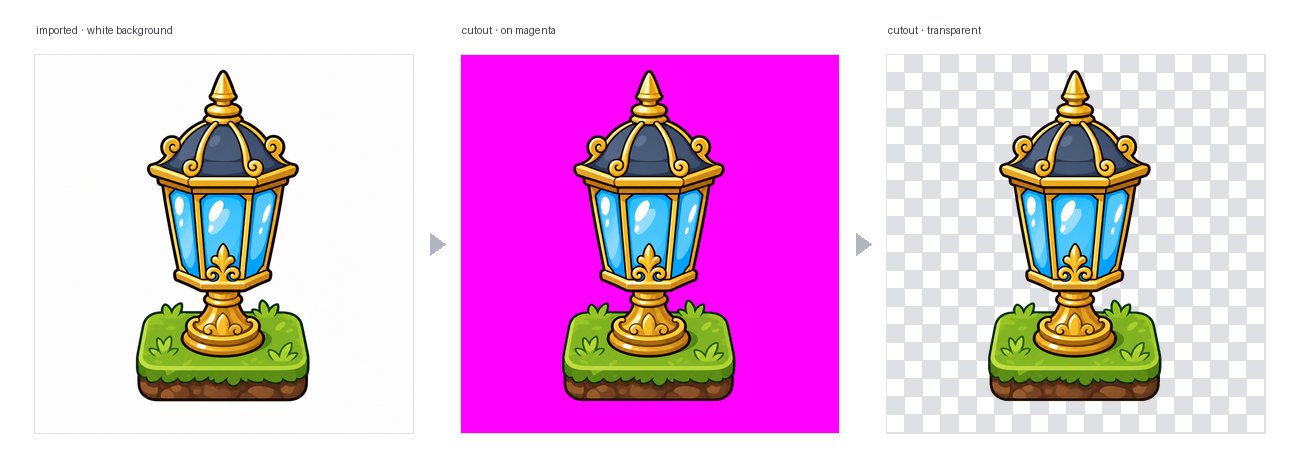
Removing the transparent background also works on its own. The example below comes from the repository. A white-background image is first changed to a magenta background, and then the magenta is removed to make it transparent.
What to do with the animation
| Where it goes | Which file to use | How to place it |
|---|---|---|
| A corner of a tutorial video, an opening or closing entrance, a goodbye wave at the end | Transparent PNG sequence, or transparent WebP | CapCut, Premiere Pro, and DaVinci Resolve can all import an image sequence. Place it as a layer over the video. |
| Animated stickers or emoji | GIF | Compress it again to meet each platform's size limits |
| A welcome wave on your personal website | WebP animation, or a sprite sheet played with code | Use an img tag with the WebP file. Ask the agent to add it to the page for you. |
GIF only supports "fully transparent" and "fully opaque" pixels, so the edges look jagged. That does not look good over video. For video, use a PNG sequence or WebP.
Notes
- If the source image is not right, everything after it will be wasted: You may only find out the face is wrong after the animation is generated. In that case, you have to start over from the source image.
- Do not request too many complex actions at once: Start with two sets, idle and wave. Add more actions after you are happy with the results.
- Check which account is used: Your subscription allowance can run out. If you choose the API, you pay for each call.
- It does not publish for you: You need to move the exported files into your video editor, chat apps, or website yourself.
Comments (0)
No comments yet. Start the conversation.