


What You'll Get
OpenClaw is installed and running persistently on your own computer. You can open its Control UI (the web-based chat and management interface) in your browser and get a reply when you send a message. Windows and Mac each have two paths: download the installer and click through it, or paste a single command into the terminal. Neither path requires you to install Node.js first.
At the end of this article is a ready-to-copy prompt. If installation fails, give it to Claude Code or Codex to troubleshoot. First, understand one thing: OpenClaw does not include a model itself. It needs to borrow an AI account you already have (a Claude Code or Codex login, or an API key). Without this, no matter how smooth the installation, you won't be able to chat.

Three Terms to Know First
- Gateway: OpenClaw's "brain process," which keeps running in the background and manages sessions, tools, and the various chat channels. It listens on local port 18789 by default.
- Onboarding (setup wizard): The question-and-answer flow on first launch that helps you connect an AI account, create a workspace, and start the Gateway.
- Control UI (control panel): The management page opened in the browser, where you can chat directly and check status.
Once installed, all three live on your own computer: memory, settings, and keys are not uploaded to OpenClaw's servers. Your conversation content is only sent to the model provider you choose and the chat platform you use.
Choose Your Path First
| Your situation | Recommended path | Key points |
|---|---|---|
| Windows 10 (20H2 or later) or Windows 11, don't want to touch the command line | Windows Hub installer | No administrator rights needed; it automatically creates a dedicated WSL environment to run the Gateway |
| Windows, comfortable with PowerShell | One-line command install | The Gateway runs directly on Windows; auto-start at boot uses a "Scheduled Task" |
| Mac, running macOS 26.2 (Tahoe) or later | OpenClaw.app installer | Lives in the menu bar; includes permission prompts, voice, and quick chat |
| Mac, running a macOS version older than 26.2 | One-line command install | The desktop app won't open; the command-line version supports down to macOS 13.5 |
Not sure which macOS version you have: click the Apple icon in the top left → About This Mac. Not sure whether Windows is x64 or ARM: Settings → System → System information, check "System type."
Step 1: Prepare a Working AI Account
The onboarding wizard automatically looks for the following in order and uses the first one that works:
- Claude Code or Codex already logged in on the computer
- The
ANTHROPIC_API_KEYorOPENAI_API_KEYenvironment variable - Local models: one you have already loaded in llama.cpp, Ollama or LM Studio
If you have none of these, the Mac version will guide you through logging in to Codex with a ChatGPT account. To understand what these are first, see the Claude handbook and the Codex handbook.
Step 2 (Windows): Install Windows Hub
- Open the OpenClaw Windows Hub download page and choose the file for your system: x64 computers download OpenClawCompanion-Setup-x64.exe, ARM computers (such as Snapdragon laptops) download OpenClawCompanion-Setup-arm64.exe. The links are in the "References" section at the end.
- Double-click to install; no administrator rights are needed throughout.
- Launch OpenClaw Companion: search for it in Start, or click its icon in the tray at the bottom right. The first launch opens setup; choose Set up locally. It will create a WSL subsystem named
OpenClawGateway, install the Gateway into it, and pair them. Your existing Ubuntu or other WSL systems will not be modified. - Choose QuickStart (recommended) as the setup mode. If you later want to change details like the port or network exposure, use
openclaw configure.
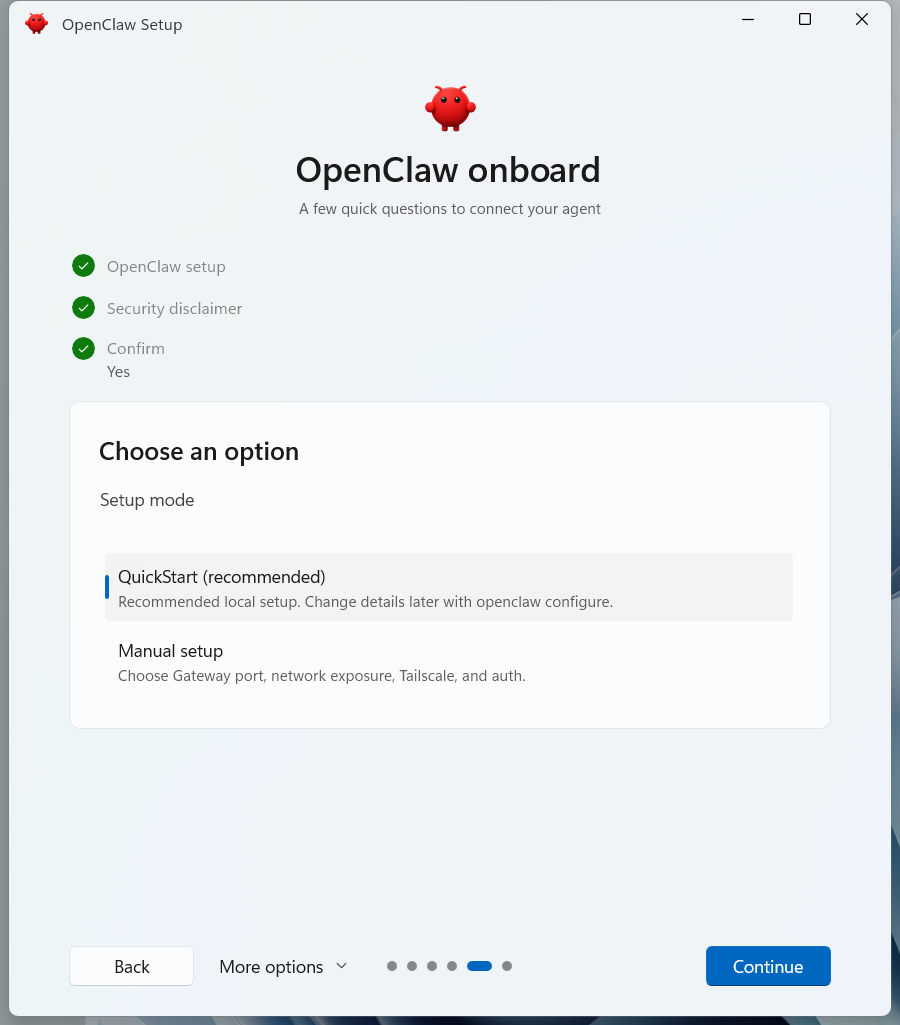
(Image from the design documents in the openclaw-windows-node repository.)
A green tray icon means the app is connected and setup is done. Clicking the tray icon shows Gateway status, sessions, and usage, and lets you open the Dashboard (control panel) or Chat (chat window) directly.

(Image from the openclaw-windows-node repository.)
Step 2 (Windows, Other Path): One-Line PowerShell Command
Press the Win key, search for PowerShell, open it, and paste:
iwr -useb https://openclaw.ai/install.ps1 | iex
This command checks for Node.js itself, installs it if missing, then installs OpenClaw and opens the onboarding wizard directly. In the wizard, choose Quick start: it verifies that your AI account works by actually sending a message, and next it wants to know whether it should stay on in the background; answer Yes. On Windows, it then registers a "Scheduled Task" that automatically starts the Gateway at boot.
If PowerShell reports "running scripts is disabled on this system," do not change the execution policy. Instead, use openclaw.cmd in the same directory:
& "$env:APPDATA\npm\openclaw.cmd" gateway status
Step 2 (Mac): Install OpenClaw.app
If your system is macOS 26.2 or later, the desktop app is the easiest option:
- Go to OpenClaw's GitHub Releases page and download the latest dmg. For Apple silicon (M-series) chips, choose the one with
arm64in the name; for Intel chips, choose the one withx86_64; if unsure, download the universal version without a suffix (for example, the file for version 2026.11.1 isOpenClaw-2026.11.1.dmg). - Open the dmg and drag OpenClaw into Applications.
- On first launch, a warning that this is an app downloaded from the internet will appear; click Open.

(Image from the macOS installation documentation in the OpenClaw repository.)
On a fresh install, the app shows a progress window: it prepares the built-in runtime environment, starts the Gateway on This Mac, then opens the onboarding conversation in the control panel. It does not automatically connect to someone else's Gateway on the local network. Connecting an AI account, importing memory, linking chat channels, and granting system permissions are all completed step by step in this conversation.
If the automatic process fails, the window switches to manual setup. Choose This Mac to create the Gateway on this machine:

(Image from the OpenClaw repository.)
System permissions (screen recording, microphone, accessibility, and so on) can be granted later at any time under Dashboard → Settings → This Mac → Permissions; you don't need to enable them all at once.
Step 2 (Mac, Other Path): One-Line Terminal Command
If your system is below 26.2, or you simply want the command line, open Terminal (search for "Terminal" in Launchpad) and paste:
curl -fsSL https://openclaw.ai/install.sh | bash
If Node is missing, the script installs Node 26 automatically, then goes straight into the onboarding wizard, with the same flow as the Windows command line. On Mac, background persistence uses a LaunchAgent (a system service that starts automatically after login).
Skipped the background option during setup? Register the service first:
openclaw gateway install
Then start it. This command waits and only returns once the Gateway passes its health check:
openclaw gateway start
Step 3: Confirm It Is Actually Running
No matter which path you took, verify with these three commands at the end (Windows Hub users can simply check whether the tray icon is green):
openclaw --version        # Prints the version number, meaning the command is installed
openclaw gateway status   # Should show the Gateway running on port 18789
openclaw dashboard        # Opens the control panel in the browser
Once the control panel opens, type "Hello, introduce yourself in one sentence" in the chat box. When you get a reply, the deployment is complete. To use it on your phone, the next step is connecting Telegram: it only requires a bot token, and it is the channel officially described as the fastest.
When Installation Fails: Hand It to an Agent
OpenClaw includes a built-in troubleshooting command, openclaw triage. It performs a read-only check of the installation status, generates a diagnostic report with keys and chat content removed, and then asks whether you want to hand it to Claude Code or Codex on your computer. You can also send the following directly to your Agent:
Sign in to unlock this key section
New accounts get 10 free credits, plus 1 more for each daily check-in. Spend 1 credit to unlock and it stays open for you.
The last two rules are the boundaries: troubleshooting must be reversible, and you must make the call before any system settings are changed.
How to Update Going Forward
- Command-line install: run
openclaw update. - Windows Hub: the tray menu has Check for Updates; it is versioned separately from the OpenClaw core.
- Mac App: updates itself; you can also download a new dmg from the Releases page and install it over the old one.
If you want to try another open-source Agent at the same time, see the Hermes Agent Windows and Mac deployment tutorial, which can directly import OpenClaw's settings and memory.
Notes
- The Mac desktop app requires macOS 26.2 or later. If your system is older, don't force an install; use the terminal command instead.
- Tools run directly on your computer by default, with no sandbox. After installation, read the official security guide before deciding which permissions to grant and which channels to connect.
- When connecting chat channels, set up pairing and an allowlist so strangers cannot send commands to your Agent.
- OpenClaw occasionally fails tasks without notifying you. Before running tasks long-term, see Pitfalls we've hit.
Comments (0)
No comments yet. Start the conversation.