

What you will get
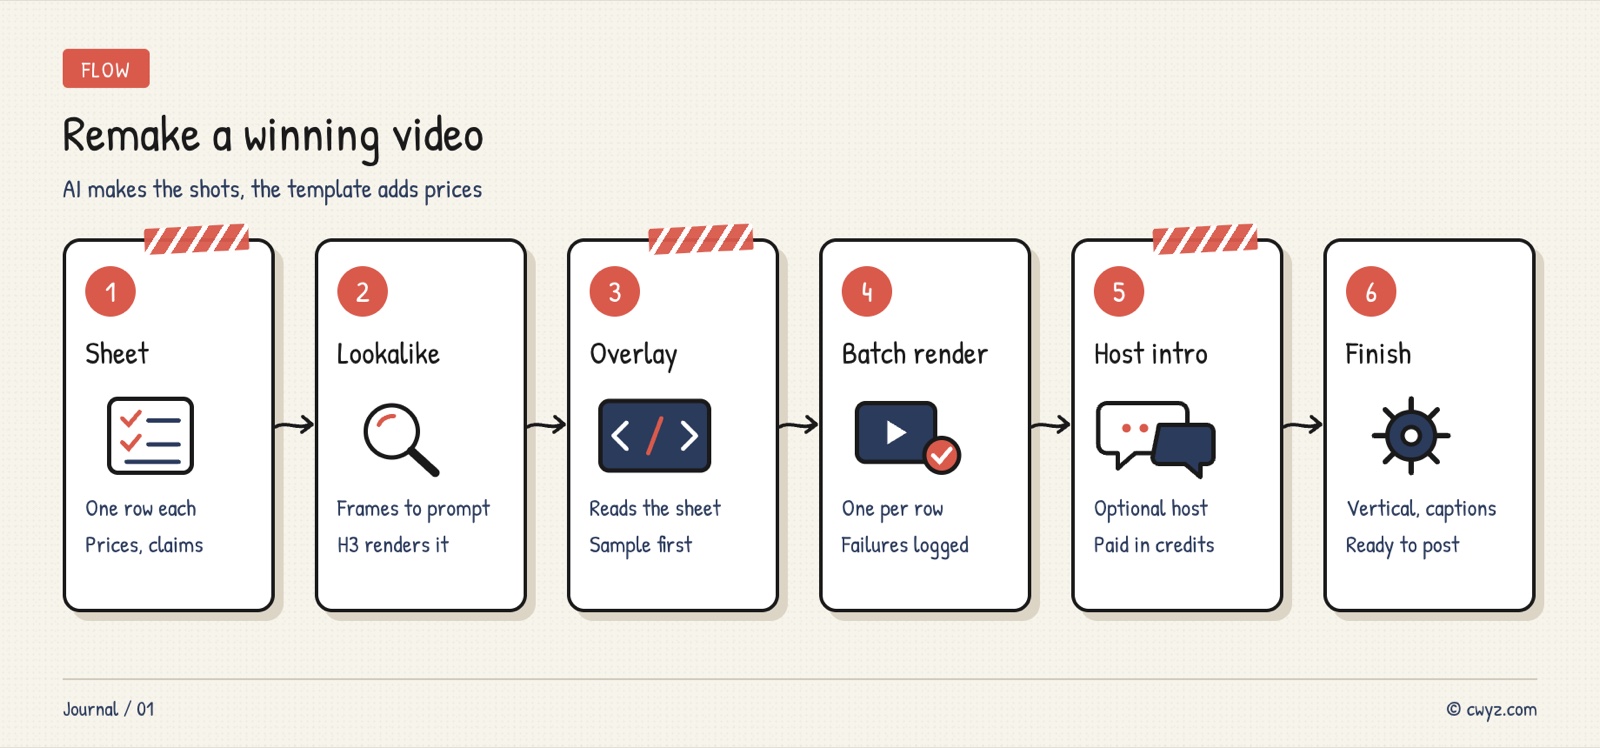
You find a product video that sells well. Your AI agent splits it into key frames by time, works out what each shot is doing, and writes a prompt that copies its structure. You then send those prompts to the H3 multi-reference endpoint on jqsp.com, which builds the same shots from your own product photos. AI does not draw the prices or the selling points. A Remotion template reads them from your product sheet and overlays them on the video. Then the free FFmpeg tool makes every video vertical and burns in subtitles. If you want a real person to say a few lines, the same platform can generate a talking-head intro to put at the start. Generated shots and talking heads cost credits. Everything else runs for free on your computer. The article includes 5 prompts you can copy and paste.
First, a word on who does what: your AI agent keeps the visuals stable and runs the repetitive work in batches. Shooting good product photos, writing honest selling points, and deciding which version is most likely to sell are still up to you. This setup pays off most for stores with many products, frequent price changes, and a need for new versions in the same style.
Here is what a finished video looks like: vertical, with the product in the center, a big hook line at the start, and then the selling points and the price.

The sample image comes from the Clipcat project's GitHub repository.
Why AI makes the visuals and the template sets the prices
AI video models are good at producing realistic product footage, but they often get numbers and text wrong. A price loses a digit, a selling point has a typo, and every product change means generating the footage again. A wrong price is the worst mistake a promo video can make.
So the setup works in two layers. AI makes only the footage, with no text on it. A template written by your agent adds the price tag and the selling-point bars, and it pulls the data from your product sheet. To change a price, edit the sheet and render again. The text will not be mistyped. Keep three rules in mind:
- Prices and selling points come only from the sheet. The template must not hard-code any product details, or you will miss updates when you switch products.
- Approve a sample first. If the template is not right and you batch render anyway, one mistake repeats across the whole batch.
- Do one final format pass. Product photos come in different proportions, so convert everything to vertical before export, and keep subtitles clear of the platform's buttons.
Step 1: Prepare the product sheet and photos
Create a folder with two things in it: a product sheet (an Excel file, or a CSV exported from an online spreadsheet) and the image files for each product. Use photos you took yourself or photos the manufacturer has licensed to you. Three or four angles per product works well, as long as the photos are sharp and the background is clean.
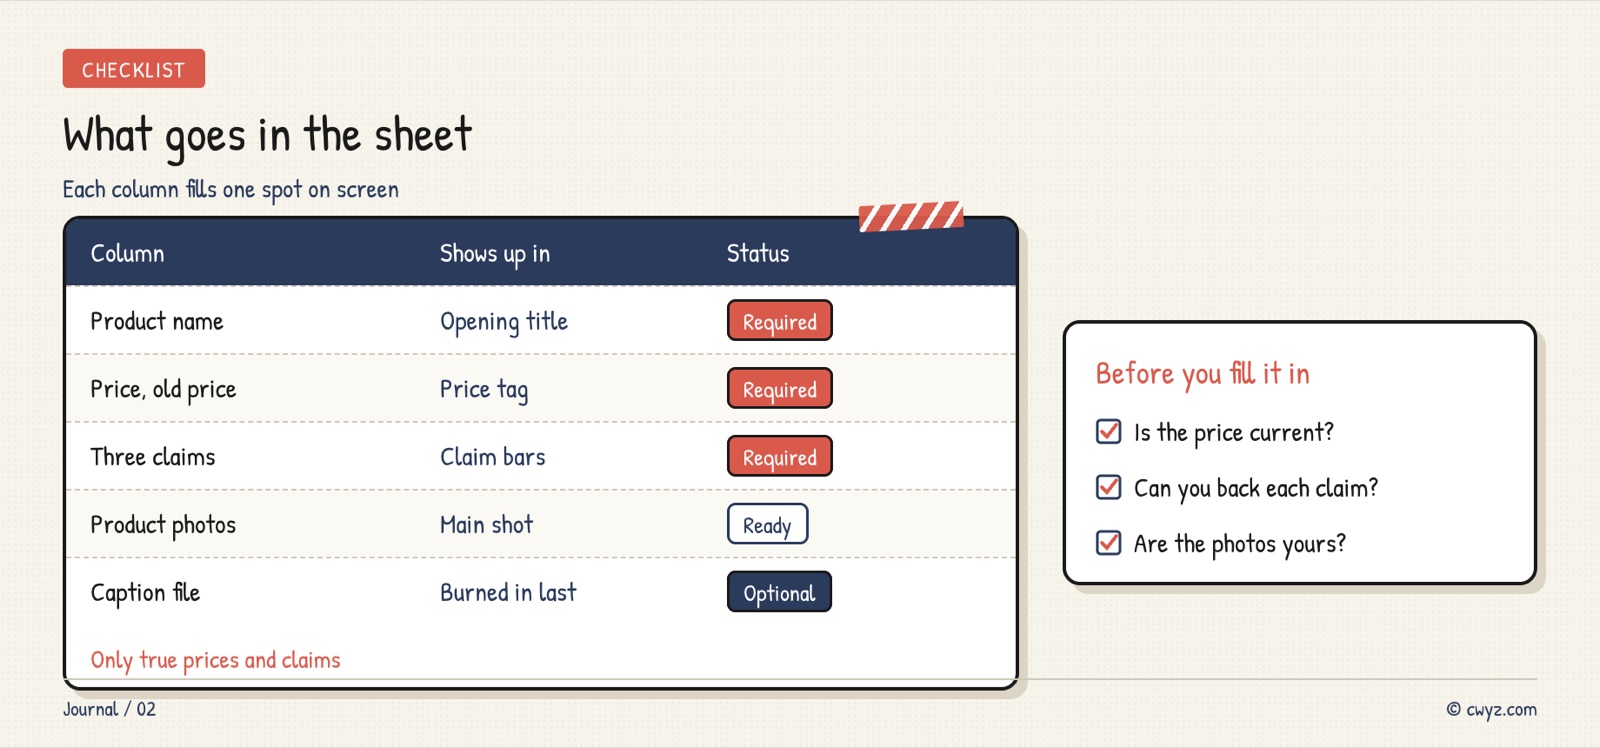
Each row in the sheet is one product. Name, two prices, and three selling points are required. If you want subtitles, add a subtitle file (.srt) with the same name as the product. Subtitles are optional. Keep each selling point short, six words or fewer, so a viewer can read it at a glance on a phone.
Step 2: Copy a viral video's shots with jqsp.com
Copying the shots takes three parts. Split the target video into key frames by time, analyze each frame, then write a prompt that imitates it, with your own product in place of theirs.
This step uses the H3 multi-reference endpoint on jqsp.com. It accepts up to nine reference images at once. Label each one as a person, a scene, or a prop. The first image is the first frame. In your script, refer to them as "Picture 1," "Picture 2," and so on. The platform then rewrites your script into a structured prompt the model can read. Each segment can be 5, 10, or 15 seconds long, and the default resolution is 480p. Reference images must be JPG or PNG, since WebP is not accepted. Generation is billed in credits, and the platform quotes a price before it renders. The final price is the one shown in the platform catalog when you start.
Save the reference video to your computer first. Download it or screen-record it, put it in your materials folder, and then send the following to your AI agent:
Sign in to unlock this key section
New accounts get 10 free credits, plus 1 more each day you sign in (none on days you don't). Spend 1 credit to unlock and it stays open for you.
Why it is written this way: extracting one frame every 0.5 seconds makes sure a slow push-in or a turn does not get missed, and the extra frames at each cut help find where each shot begins. The "job" column in the shot table is the most useful part, because it shows which seconds of a hit video do the heavy lifting. Extracted frames are only for analysis and never go into generation. The references are all your own product photos, so what gets generated is your own footage. You copy the structure and the rhythm, not someone else's content.
If generating the shots is not worth the credits to you, skip that part. Take the shot table straight to the next step and animate your product photos with a slow push-in instead.
Step 3: Have your AI agent build the promo template
A good template pays off on every video you make after it, so this is the step to spend the most time on. Send this to your AI agent:
I want to build a vertical promo video template for my product, using Remotion on my own computer. My materials are in: [your folder path], which contains a product sheet and product images.

1. First, check whether Node.js is installed on my computer. If it is not, tell me how to install it, and wait for my approval before installing. Then create a new Remotion project, install the official Remotion Agent Skills (GitHub: remotion-dev/skills), and follow their approach when you write the code.
2. Video spec: 1080 × 1920 vertical, 30 fps, about 15 seconds. If there is a clips folder and a shots.json from the previous step, use those clips as the background footage, and overlay the product name, selling-point bars, and price tag at the times and positions listed in shots.json. Item 3 below is then only a reference. If there are none, use the product images as the visuals.
3. Pacing:
   - First 2 seconds: the product name appears in large text, with an eye-catching opening motion.
   - Middle: the product image slowly pushes in or pans, and the three selling points slide in from the side one at a time, each staying on screen long enough to read.
   - Last 3 seconds: a price tag. The original price is crossed out, the current price is large and pops in, and a line such as "Tap the link below" appears.
4. Read all text and images from parameters (product name, current price, original price, the three selling points, image list). Do not hard-code any product information in the template.
5. Place the text and price tag in the upper middle of the frame, and leave about the bottom fifth of the frame clear, so the platform's buttons and captions do not cover them.
6. Render a sample using the first row of the product sheet, and open Remotion Studio so I can preview it.
7. Stop once the sample is done and wait for me to say what to change. Do not batch render yet.
Why it is written this way: item 4 means that changing products later only requires changing data. Item 5 covers a mistake many people make on their first try, which is subtitles and prices hidden behind the platform's buttons. Item 7 lets you get the sample right before you spend time on a batch render. When you preview, describe the changes in plain words, such as "the selling points come in too fast," "make the price tag bigger," or "switch to warm colors." Keep asking for changes until you are happy with it.
If this is your first time with Remotion, this beginner tutorial explains how the preview window works.
Step 4: Batch render the whole sheet
Once you are happy with the sample, have your agent run the whole sheet:
The sample looks good. Please write a batch render script.

1. Read the product sheet one row at a time. Render one video per row, name each file by product name or ID, and save it to an out folder.
2. Render only the first two rows first, and show them to me. Run the rest only after I confirm they look right.
3. If a row is missing an image or has an empty field, skip that row, write the reason to a log file, and keep going. Do not stop the whole batch.
4. When it finishes, give me a table showing which rows succeeded, which were skipped, and why.
Why render two rows first: the data in a sheet is often messier than the sample row. A selling point may be very long, or an image may be landscape. Rendering two rows first catches layout problems early. When you change prices or add new products later, just update the sheet and have your agent run this script again.
Step 5 (optional): Add a talking-head intro with jqsp.com
Even good product footage can lack the trust that comes from a real person speaking to the viewer. The talking-head feature on jqsp.com can fill that gap. Give it a presenter photo and a script, and it generates a clip where the lip movements match the words. You can use your own photo and voice. To use your voice, upload a recording of yourself speaking on the voice settings page. If you skip that, the platform generates a fictional presenter.
This step costs credits. According to the official Skill, a 15-second talking head costs about 63 to 69 credits. The price shown in the catalog when you start is the final price. Your agent quotes the cost before every charge and waits for your approval. You create your own account and API key on jqsp.com.
Please use the jqsp.com talking-head Skill to make an opening intro for my promo video. First read https://jqsp.com/skills/jqsp-talking-head/SKILL.md, and follow its steps:

1. I will create my API key on jqsp.com and give it to you. Do not call any API before I have given you the key.
2. Presenter: [my own photo / a fictional presenter]. Voice: [the voice I uploaded to jqsp / auto-generated by the model].
3. Length: 10 to 15 seconds, 9:16 vertical. Write the script from row 1 of the product sheet: one line on the pain point, one line on why this product, and one line that points viewers to the price below. Use only the selling points written in the sheet. Show me the script before you generate anything.
4. Choose a style suited to product promos. The presenter appears only on the key line, and the product footage fills the rest of the time.
5. Before each step that costs credits, tell me the cost and wait for my approval. Spend no more than [credit budget] credits in total.
6. When it is generated, show me the raw clip first, and save it to an intro folder. Do not add any post-production yourself.
Why it is written this way: limiting the script to the selling points in the sheet keeps the presenter from making claims you cannot back up. The fixed budget keeps the agent from overspending through repeated retries. If you want to work out the cost first, read this experience post. To set up a presenter and a voice once and reuse them, see this advanced tutorial.
Step 6: Finish with FFmpeg
The last step goes to FFmpeg, a free command-line video tool that most video converters use under the hood. Send this to your AI agent:
Please use FFmpeg to finish the videos in the out folder, and save the results to a final folder.

1. First, check whether FFmpeg is installed on my computer, and whether it can burn in subtitles. If it is not, tell me how to install it, and wait for my approval before installing anything.
2. If there is a talking-head video in the intro folder, put it at the start of each product video, with a very short fade-in and fade-out between them. If there is none, skip this.
3. Convert everything to 1080 × 1920 vertical. Add padding to videos with the wrong aspect ratio. Do not stretch or distort the picture.
4. If a .srt subtitle file has the same name as a video, burn the subtitles into the picture. Make the text readable on a phone, with white letters and a black outline, placed above the bottom button area. Skip this step for videos with no subtitle file.
5. Normalize the audio volume, so one video is not much louder than the next.
6. Export as H.264 video with AAC audio, using settings suited to web playback.
7. Write this as a script that can be run again. When it finishes, give me a table showing each video's duration, resolution, file size, whether subtitles were burned in, and whether a talking-head intro was added.
Why this step is separate: Remotion handles the visuals, and FFmpeg handles the delivery format. Keeping them apart means that if you move to a platform with different requirements, such as square video, you only change this script and leave the template alone.
Notes
- Remotion is not free for everyone. Individuals, companies with up to three people, and nonprofits can use it for free. Larger companies need a paid company license. Read the license page before you use it.
- Use only true prices and selling points. The sheet is your promise to buyers. Exaggerated claims or wrong prices will come back to you, from the platform and from buyers.
- Make sure you have the rights to the images and presenters. Do not take photos from other sellers' product pages or viral videos. Talking-head presenters must be you or someone who has given permission. Do not use the faces of celebrities or influencers.
- Generated shots and talking heads are AI-made. When you post them, label them as AI-generated, as the platform requires.
- Copy the structure only. Frame extraction is for understanding how others shoot. Do not carry over their footage, people, or copy, and do not use their videos as reference images.
- Check product details against the real item. Details like logos and small print on packaging can warp in AI footage. Check every video before you post it, and regenerate it or use real footage if something does not match.
- Do not expect the first version to sell. The template gets you fast, consistent output. Which hook and which selling points convert best only shows up after you post, so use those results to improve the template.
Comments (0)
No comments yet. Start the conversation.