


What You'll Get
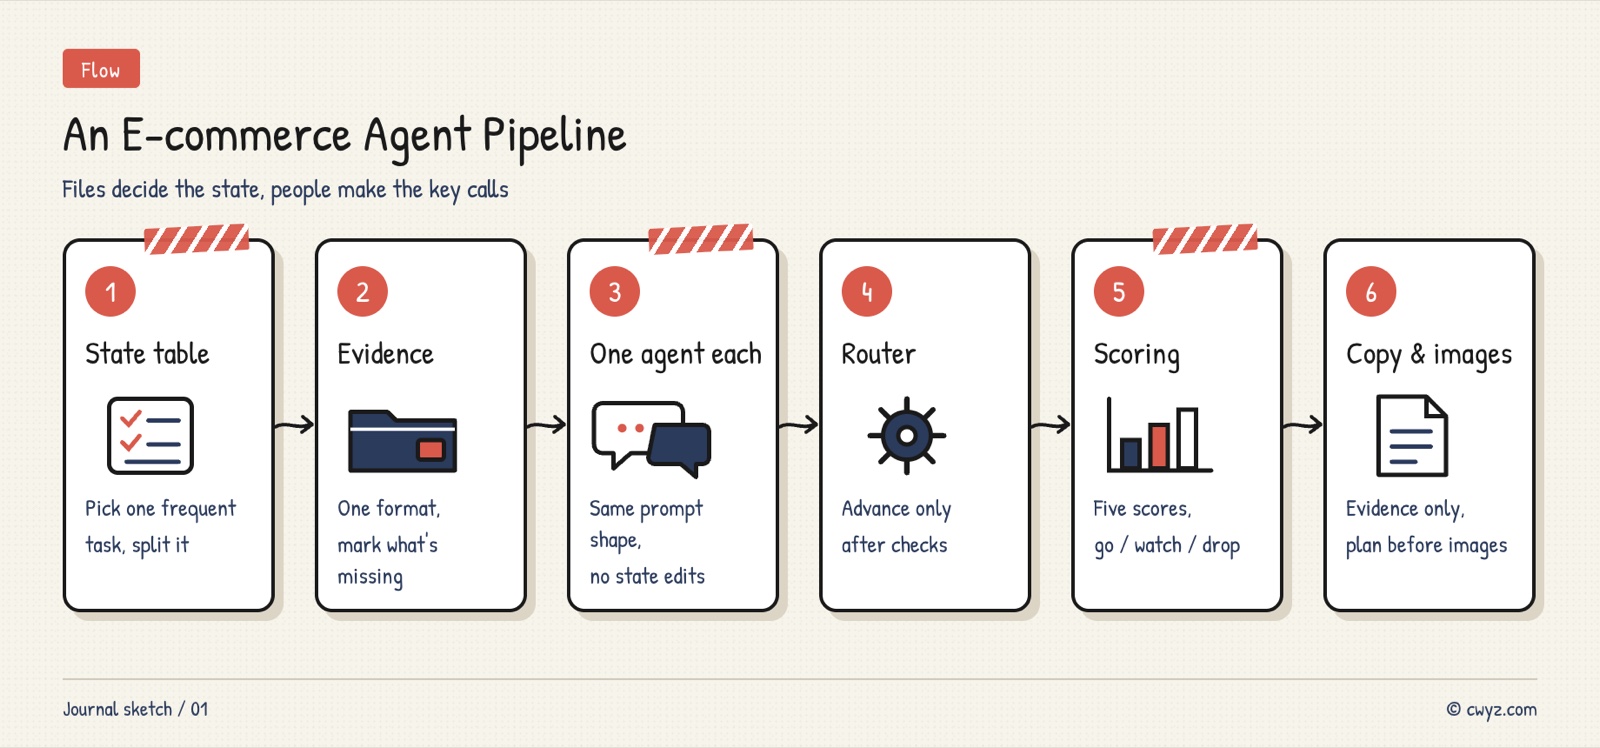
Here's how to set up a local pipeline for pre-launch work on Amazon, covering product selection, reading competitor reviews, writing listings, and finally planning product images. Your AI agent moves each task through the stages one at a time. Each stage has exactly one agent doing the work. When it finishes, it saves the result to a file and moves the task to the next state. If your connection drops, your laptop shuts down, or a step fails, the next run picks up at the stage where it stopped. Keywords and reviews gathered earlier feed straight into later stages, so you never have to copy and paste things back and forth. The tutorial includes 6 prompts you can copy and use as-is.
Let's be clear about who does what first: the agent pulls data, proposes candidates, and drafts the copy. You decide which product to sell and whether the copy is ready to go live. This approach suits people already selling cross-border on Amazon, or teams bringing AI into their e-commerce operations. It won't tell you which product is guaranteed to take off.
Why Split It Into Stages
The simplest idea is to write one massive prompt and have a single agent go from keyword research all the way to image generation. That falls apart after a few runs. The prompt keeps growing, and the model occasionally skips a step. When something fails, you don't know where to restart. And if you change the product info, it's hard to tell which results need redoing.
Breaking the process into a chain of states fixes this. At any moment, each task sits in exactly one state, such as "Reviews analyzed." Each agent has one job: move the task from one state to the next. Check the conditions before the move, and check the results after it. In software, this is called a state machine. Think of it as an assembly line with checkpoints.
Keep three things in mind when you build it:
- State is decided by files: An agent saying "done" doesn't count. The state only advances when the matching output file exists and passes format validation.
- Every piece of data has a source: Data pulled from an API, data you supplied, and data still missing should each be clearly labeled, so later agents don't mistake guesses for facts.
- Key decisions belong to humans: Product selection and final copy each get a human sign-off. Nothing moves forward until someone approves it.
Step 1: Pick One High-Frequency Task and Define the State Table
Don't try to build the whole system at once. Pick one task your team does every week that eats up the most manual time, such as the pre-launch listing work for new products. Break it into a few states. For each state, write down who moves it forward, what it needs to enter, and what it delivers when it leaves.
A full pre-launch workflow can be broken into the stages below. The diagram shows the entry conditions and deliverables for each stage:
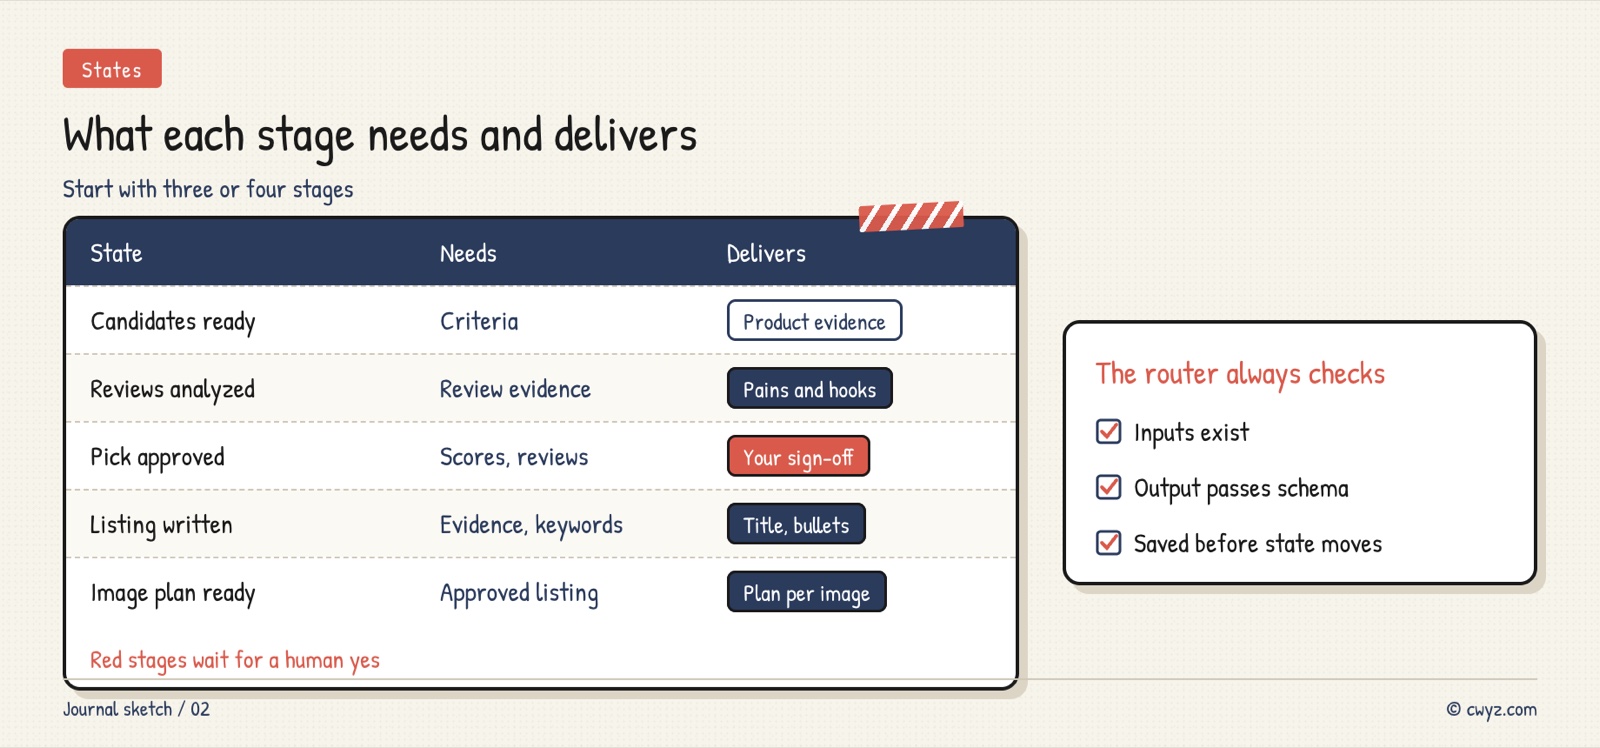
For your first version, three or four stages are enough, such as "Materials ready → Competitors analyzed → Listing written → Human approved." Once that runs smoothly, add product selection at the front and image plans at the back.
Step 2: Connect Your Data and Organize It into Evidence
How good an agent's judgment is depends mostly on the material it gets. Common cross-border data includes product details, keywords and search volume, reviews, and ad data, plus your own product materials. Maintaining scrapers yourself is tedious, and many e-commerce data platforms now offer APIs built for AI. For example, SellerSprite's MCP interface (MCP, or Model Context Protocol, is a standard plug that lets AI call external tools directly) bills per call. Sorftime and other platforms offer similar services. Check each vendor's website for current plans and pricing before you choose one.
Different sources return data in different formats. One might list a price as a number, while another gives text with a currency symbol. Some reviews include the full text, and others show only a star rating. If you feed this raw data straight to a model, it's easy for it to misread things. So add a cleanup layer in front of the agents, and have your AI agent build it:
In [project folder], add an "evidence organizing" layer for me. I will pull data from [SellerSprite MCP / an exported spreadsheet / my own product materials].
Requirements:
1. No matter where the data comes from, convert it to one format: one JSON file per product, saved under evidence/.
2. Every field carries three things: the value, its source (which API or which file), and when it was collected.
3. If a field can't be retrieved, write "missing." Don't estimate it, and don't fill in a default.
4. Standardize prices as a number plus a currency code. Standardize reviews into four items: star rating, body text, date, and variant.
5. When done, show me one complete evidence file for a product, then list the three fields that are missing most often in this batch.
The rule that matters most in this step is "write 'missing' when data is missing." Every later agent works only from the evidence files. Gaps are obvious at a glance, and no agent gets thrown off by a made-up number.
Step 3: One Agent per Stage, All Using the Same Prompt Structure
Each stage's agent does just one thing. Write every stage's prompt with the same template: what to read, what to deliver, what not to do, and when to stop and ask a human. A consistent template makes it easy to add a stage later or swap in a different model.
You are the agent for the [review analysis] stage. Your only job is to move the task from [Reviews fetched] to [Reviews analyzed].
Read: the review data and product evidence under tasks/[task ID]/evidence/.
Deliver: tasks/[task ID]/artifacts/[review-analysis].json. Its fields must match schemas/[review-analysis].schema.json.
Do not:
- read or modify artifacts from other stages;
- make up any numbers, reviews, or selling points that aren't in the evidence files;
- change the task state yourself. The router updates the state.
If evidence is missing, data conflicts, or a business judgment is needed, write it in the open_questions field of the deliverable, then stop.
That last rule, "don't change the task state yourself," matters most. The agent only delivers output. The router checks that output before the next step and then updates the state, so nothing can skip the checks.
Step 4: Have a Router Handle State and Validation
This step is the backbone of the whole pipeline. A small program reads the current state and decides which agent to call next. After the agent delivers, the program checks the output, saves it, and updates the state. Have your AI agent write the program:
Sign in to unlock this key section
New accounts get 10 free credits, plus 1 more each day you sign in (none on days you don't). Spend 1 credit to unlock and it stays open for you.
Point 6 solves the "I changed the materials but don't know what to redo" problem. Stages run in order, so if you change one stage, mark that stage and every stage after it as "needs redo," and leave earlier results alone. Point 7 has the agent demonstrate a resumed run in front of you. Once you're confident the skeleton is solid, connect real models and real data.
Step 5: Narrow Candidates Down with Scoring
Once the skeleton works, you can attach product selection to the front. The selection agent's job is to rule out directions that clearly aren't worth pursuing. It can't predict which product will become a hit. Start by defining the criteria yourself: target marketplace, price range, supply chain you can handle, and categories to avoid. The agent then pulls data through the API to build a candidate pool, scores each candidate across several dimensions, and picks a small number to read reviews for.
You are the product selection agent. Goal: [Amazon Japan], price band [¥2,000–4,000], avoid [battery-powered, liquid, and child-safety-certified categories].
1. If I haven't picked a specific product yet, first give me 10 keyword directions, with only the direction and the reason for each. Don't include any search volume or sales numbers. I'll pick from them.
2. After I choose, use [SellerSprite MCP] to look up these keywords and their matching products. Build a candidate pool and save it under evidence/.
3. Score each candidate on five items (1–5 points). For each score, write the data used and its source:
   - Demand: search volume and growth trend;
   - Competition: click share and ad share of the top sellers, and their average review count;
   - New-product opportunity: whether new listings and new brands from the past year are holding their ground;
   - Profit: average price, return rate, and fulfillment method;
   - Risk: whether clicks and brand share are concentrated in a few sellers.
   For any item with missing data, write "missing" and don't score it.
4. Sort by total score and pick the top [5–10]. Read their reviews. First remove duplicates, vague praise, pure shipping complaints, and reviews about other variants. Then answer: why do buyers purchase, what do they like most, what do they keep complaining about, and which complaints can be fixed by changing the product?
5. Finally, give each candidate a verdict (Go, Watch, or Drop) with one sentence of reasoning. I make the final call.
The first rule, "give directions, not numbers," guards against made-up data. Before you've pulled any data, a model's search volume figures are pure guesses. Once you've read the reviews, the complaints that keep coming up point to what you should change in the product, and what buyers like most is the selling point to push in your ads.
Step 6: Write Listings and Image Plans from Evidence Only
The most common problem with listing copy is that the model can't tell confirmed facts from things it made up. Have the listing agent read the product evidence, the competitor review analysis, and the keyword data together. It should first sort the keywords into tiers, then place them in the title, the five bullet points, and the backend search terms:
You are the listing agent for this stage. Read the product evidence, the competitor review analysis, and the keyword data, then write the listing for [Amazon Japan].
1. First, sort the keywords into four groups: core product terms, attribute terms, use-case terms, and long-tail terms. Tag each term with its source and search volume.
2. Title: product type + core term + the one or two most important differentiators.
3. Five bullet points: each point covers one use case or one problem the product solves. Prioritize addressing the concerns that keep coming up in competitors' negative reviews.
4. Backend search terms: add synonyms and long-tail terms the title doesn't cover, and don't repeat words already in the title.
5. Only write parameters and features that appear in the evidence files. If something isn't in the evidence but you think it should be included, add it to a "to confirm" list instead of putting it in the copy.
6. Finally, check your work: are there any attributes, use cases, or purchase concerns that buyers care about most that you missed?
Product images follow the same approach: plan first, then generate. If you ask an AI to generate images directly, you often get wrong colors, incorrect specs, distorted logos, or extra accessories the product doesn't come with. So the image-plan stage comes after the listing and works from the selling points and the real product photos:
You are the image plan agent for this stage. Read the approved listing and the real product photos (tasks/[task ID]/evidence/photos/).
Write a plan for each of the [7] product images:
1. The role of this image (main image, selling-point image, lifestyle image, size chart, and so on) and the one selling point it should highlight;
2. Composition: subject placement, background, and props. Props must not be accessories the product doesn't actually come with;
3. Any text on the image may only use wording confirmed in the listing;
4. The prompt for the image generation model, including the line "Product appearance, color, and logo must match the real product photos";
5. Visual consistency: [our brand's color and font requirements].
Show me the plans first. I'll approve them before any images are generated.
Notes
- Start with one short chain: Use three or four stages plus one human checkpoint. Once that runs reliably, add product selection and image plans. Don't aim for full automation in week one.
- Data APIs charge per call: Selection and review analysis make many calls. Test on a small scale first, and measure what one full run costs before you scale up.
- Platform rules change: Category restrictions, image requirements, and banned words in copy all shift over time. Before you publish, have a person check everything against the latest requirements in Seller Central.
- Review data isn't always complete: Review APIs sometimes miss reviews. For important candidates, cross-check two sources.
If you want to start by learning with a single agent, read Let AI Do the Work for You, Starting With One Agent. For the product video part of this workflow, read Let Your AI Agent Remake Viral Promo Videos for Your Product.
Comments (0)
No comments yet. Start the conversation.