
What You Get
Give your AI agent the free, open-source lanshu-create-ai-presenter-video Skill, and it can turn a knowledge point or a script into an explainer of about one minute. As the narration plays, the picture acts out each sentence. Subtitles appear word by word, and chapter labels and a closing punchline are added too. Nobody needs to appear on camera, and you don't need to edit anything. The article includes three prompts you can copy.
You only decide what to explain, pick a style you like, and look at the draft to say what needs changing. From setting up the environment to checking the final video, the agent handles the rest. The only step that costs money is voice-over, and before it starts, the agent tells you how much it will cost.
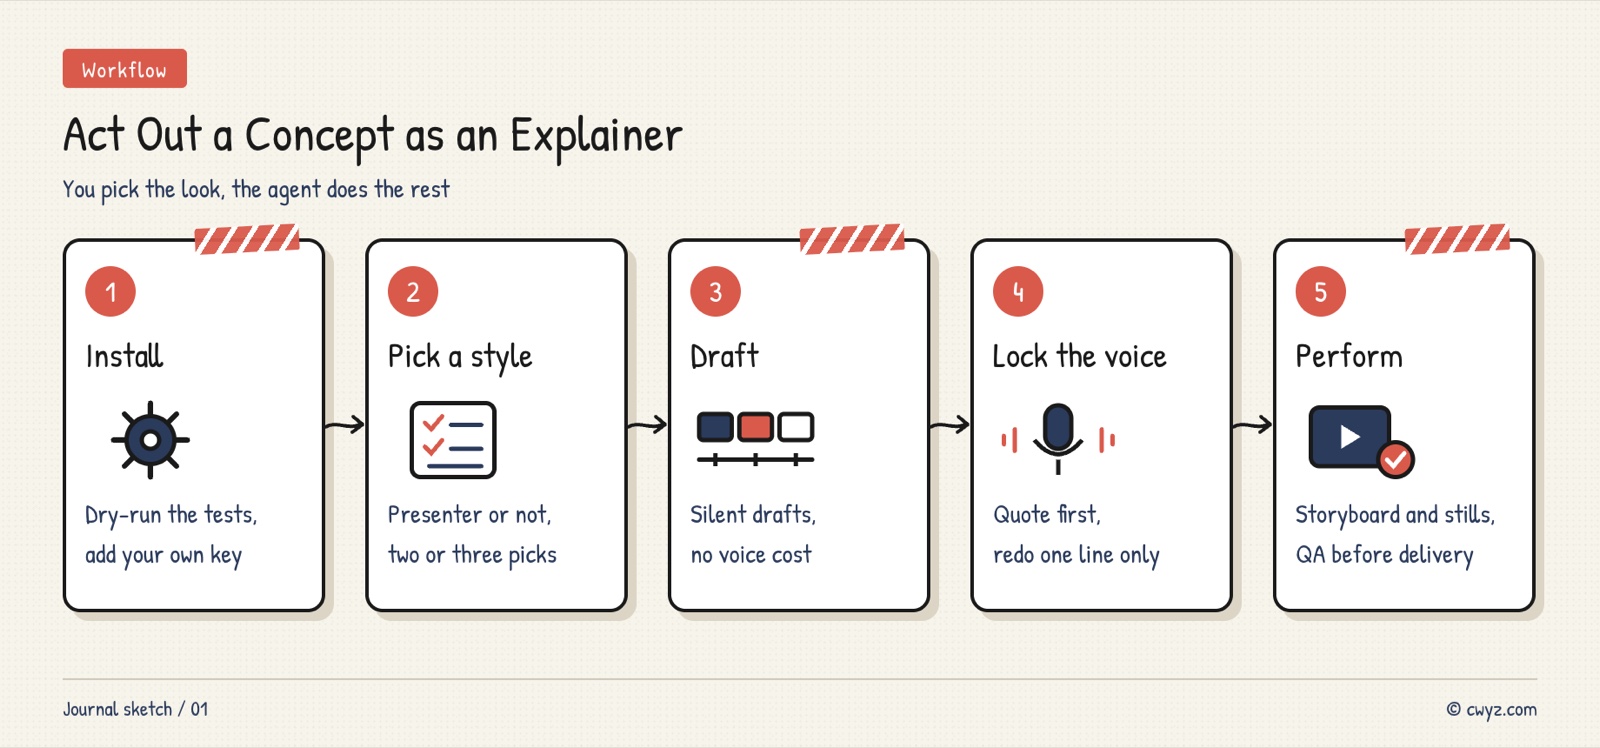
First, have your agent install the Skill. Then choose between a presenter on screen or no presenter, pick a style, and compare a few silent drafts. Once the script and voice-over are settled, have the agent animate the video line by line. Finally, read the check report it hands back and watch the finished video.
What the Skill Is
Think of a Skill as a specialist instruction manual written for an AI. This one is maintained by the developer Lanshu, released under the MIT license, and has about 3,000 stars on GitHub. It works with AI agents that can read files and run commands, such as Claude Code, Codex, Gemini CLI and Cursor. It offers two routes:
| Route | What the video looks like | What you need | What costs money | Aspect ratio |
|---|---|---|---|---|
| Explainer style | No one appears on screen. Every sentence is animated. | A topic or a script | Voice-over only (free if you record your own narration) | Landscape 16:9 only |
| Digital presenter | An AI presenter talks to the camera, with subtitles and keyword animations | A script, plus a photo of an adult you have the rights to use | Voice-over and the presenter video | Vertical 9:16 by default |
This article focuses on the first route, because it has the lowest barrier to entry. It needs no photos and no graphics card, and the only thing you pay for is voice-over.
The explainer route has twelve styles. The first nine are visual looks, and any of them works with the same script. They include Warm Paper, a white-space look with vermilion accents, and Dark Tech, a dark, high-tech look. There is also Notebook, handwritten on grid paper, along with Chalkboard and Clay Town, a cute clay-model village.
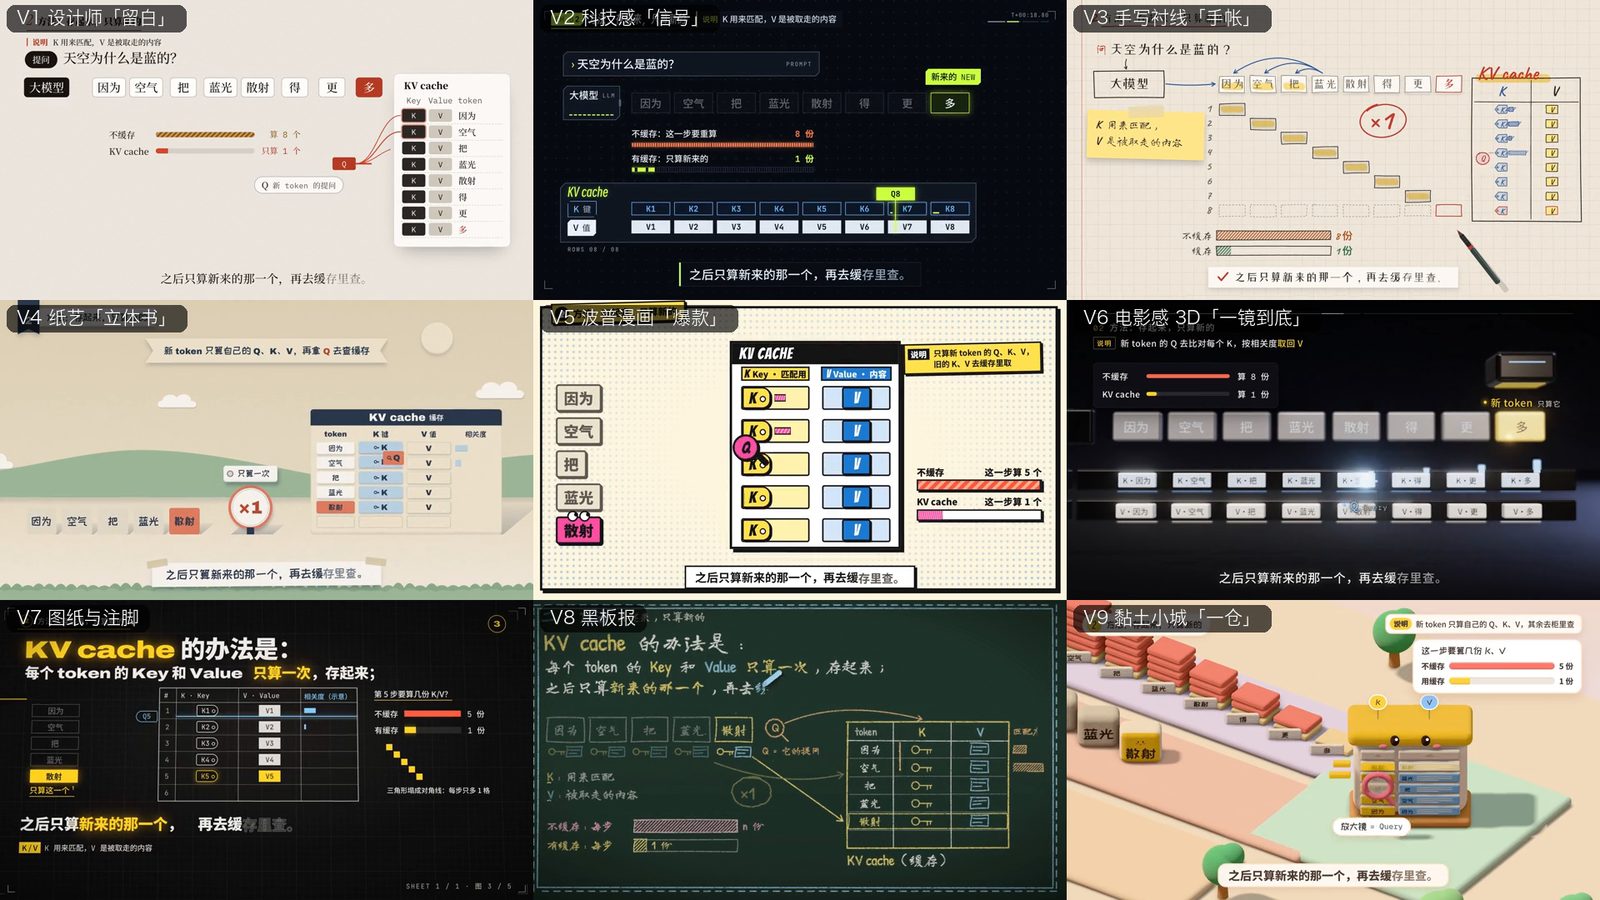
Image from the project's GitHub repository.
The last three are narrative styles. Here, both the visuals and the structure of the script change. Derivation builds diagrams and formulas step by step on a dark canvas. Casefile works like a detective story, tracing an anomaly back to its solution. Sitcom puts characters in everyday situations where they run into a misconception and then work out the cause.

Image from the project's GitHub repository.
Step 1: Have Your AI Agent Install the Skill
The Skill needs Python, FFmpeg (a free tool for processing audio and video) and Node.js. Voice-over uses MiniMax by default, which requires a MiniMax API key. Give your AI agent this prompt:
Help me install the open-source lanshu-create-ai-presenter-video Skill (github.com/cclank/lanshu-create-ai-presenter-video) so I can make explainer videos with it.

1. First, do a read-only check to see whether my computer has Python 3.9 or newer, FFmpeg (including ffprobe), jq, rsync and Node.js. If anything is missing, tell me what to install and why, and wait for my approval before installing anything.
2. Following the README, put the repository in your own Skill directory. Keep the folder name lanshu-create-ai-presenter-video unchanged.
3. Run the repository's own tests, the two smoke tests in the tests folder. They don't call any paid service, and they confirm the environment works.
4. Voice-over needs a MiniMax API key. Tell me where to get one and how to set it as the environment variable MINIMAX_API_KEY. I will enter the key myself. Don't ask me to send you the key.
5. When you're done, tell me in plain language what was installed, how much disk space each part takes, and whether the tests passed.
The third item asks the agent to run a dry test first. If the environment has a problem, you'll find out at this stage, before you spend anything on voice-over.
Step 2: Choose a Style and Compare Silent Drafts
When picking a topic, keep one rule in mind: each video covers one concept. Topics like "What is RAG?" or "Why do phones slow down over time?" work well in about a minute. Trying to teach a whole course in one video is too much.
If you're not sure which style to pick, have the agent make a silent draft in all nine visual styles. It's free, and it puts the drafts into one comparison image for you.
Sign in to unlock this key section
New accounts get 10 free credits, plus 1 more each day you sign in (none on days you don't). Spend 1 credit to unlock and it stays open for you.
The last step is the checkpoint for the whole video. The visual style affects how the script is written, and the voice-over can only be recorded once the script is final. After the voice-over is set, subtitles, shots and visuals are all timed to it. Settle these two decisions during the free stage, and you won't have to redo work later.
Step 3: Lock the Voice-Over, Then Animate It Line by Line
Once the script is final, the voice-over is generated one sentence at a time and saved. If you change a sentence later, only that sentence gets re-recorded. If you already recorded your own narration, you can hand it over directly and skip the voice-over cost.
The script is final, and the style is [chosen style]. Please continue following the Skill's workflow:

1. Before generating any voice-over, tell me how many sentences there are, which voice you'll use and the estimated cost. Wait for me to say "start" before generating anything. [If I recorded my own narration: the audio is at FILE PATH. Use it. Don't generate another voice-over, and don't use it to clone a voice.]
2. After the voice-over, produce a playable draft video and show me the storyboard table: which visual goes with each line of dialogue.
3. After I confirm the storyboard, animate each sentence. Each visual must land at the moment its matching word is spoken.
4. Before rendering, run the checks and capture a few key frames from each chapter for me to review. Look for text covering the visuals, frozen frames and typos in the subtitles.
5. When I say "render," produce the final video, and tell me where the final video, the shareable version and the subtitle file are.
Review the storyboard and key frames before rendering. Changes are cheapest at the screenshot stage, while rendering the final video takes a long time.
Step 4: Read the Check Report, Then Watch It Yourself
Before handing over the file, the Skill runs its own checks. The video must decode completely. The audio is normalized to -16 LUFS (LUFS is the unit for measuring perceived loudness, and -16 is a common standard for online video). The Skill also checks for black screens and frozen frames, then generates a nine-grid thumbnail. If the file fails a check, the Skill won't hand it over.
Your job is to watch the whole video from start to finish. Check whether the facts are right, whether the analogies fit, and whether any line is animated in a confusing way. If something doesn't work, tell the agent something like "change the visual for line 5 to ...", and it will redo only that line.
Putting a Digital Presenter on Screen
The other route is the digital presenter. You give the agent a photo, and it finds a service that can generate a digital presenter video. The person in the photo delivers your script to the camera, and the agent adds subtitles and keyword animations. This route requires more care:
- The photo must be authorized: use your own photo, or one from someone who has agreed to it, and the person must be an adult. The agent asks you to confirm this before uploading anything.
- Don't misuse voices: cloning a voice requires your explicit permission, and the agent won't guess a voice from a photo.
- Test a short clip first: the agent makes a low-cost sample before generating the full video. Before any paid call, it reports what will be uploaded, how many seconds will be generated and roughly what it will cost. After three unsatisfactory attempts in a row, it stops and checks with you instead of spending more.
To run a digital presenter on your own graphics card, see Make a digital presenter video with your AI agent on your own GPU.
Things to Know
- Explainer videos are landscape only: for vertical platforms like TikTok, Reels or Shorts, either accept landscape or switch to the digital presenter route.
- 3D styles render slower: One-Take and Clay Town use 3D visuals, which render much more slowly than the other styles. For your first video, choose a flat style.
- Voice-over is billed per sentence: heavy script rewrites mean paying for voice-over again, so lock the script during the draft stage.
- Label AI-generated videos: when you publish, add the AI-generated label that each platform requires.
If this is your first time making an explainer animation with Remotion, you can follow Explainer animation without editing skills alongside this guide. For a faceless knowledge video in a handwritten-notebook style, see A step-by-step guide to faceless knowledge videos.
Comments (0)
No comments yet. Start the conversation.